When Agentforce was released, the obvious use cases were internal AI chat for employees using Salesforce and customer-facing chat support integrated with Omni-Channel, but Salesforce announced support for calling Agentforce from flows as well. At first the flows use case made less sense to me (especially with the price for each Agentforce conversation at around $2), but since then I’ve seen use cases where calling an agent from a flow has made sense and I have a few key takeaways and tips.
The Use Case
Company Overview
For the purposes of this post we’ll look at a fictional coffee shop - “The Best Bean” - that sells freshly brewed coffee and locally roasted beans both online and at two physical locations. Their logo is a coffee bean roasting in the sun at a beach:

The Best Bean uses Salesforce Service Cloud to handle cases and customer requests, but they don’t have a large enough staff to have people online to respond 24/7 or even 9-5 so they haven’t set up Omni-Studio and they don’t have chat available on their website. Instead customers can submit questions through a contact form on their website or by sending an email to support. Both of these support avenues create a case in Salesforce and staff respond to these cases within 1 business day.
Recently, the business has been growing rapidly and leadership at The Best Bean has decided to use Agentforce to help triage cases and keep up with the growth without hiring additional support staff. Although they’ve decided to implement Agentforce, they’re not interested in adding new methods for case creation or ways for customers to communicate with them. They’re ok with the web form and email options and don’t want to add chat to their site or setup Omni-Channel.
Enter Agentforce and Flows
Since the company doesn’t want to add chat or Omni-Channel this is a perfect use case for calling an agent from flows instead! They setup a record-triggered flow that calls an Agentforce agent and passes it the case that triggered the flow. Then the agent classifies the case and attempts to resolve it.
We’ll go through some steps below to create a sample flow and agentt for The Best Bean using a Salesforce Developer Edition org. You can read through the steps, create your own Developer Edition org here, or skip to the key takeaways if that’s what you came here for.
Agentforce and Flow Setup
Enabling Agentforce
- Go to setup and search for Einstein Setup, then click on it
- Make sure that Turn on Einstein is toggled to On
- Refresh the page and search for Agentforce Agents then click on it, you might have to refresh a few times if you search doesn’t return any results at first.
- Make sure that the Agentforce toggle at the top of the page is set to On
At the end of these steps, your Agentforce Agents page should look like this: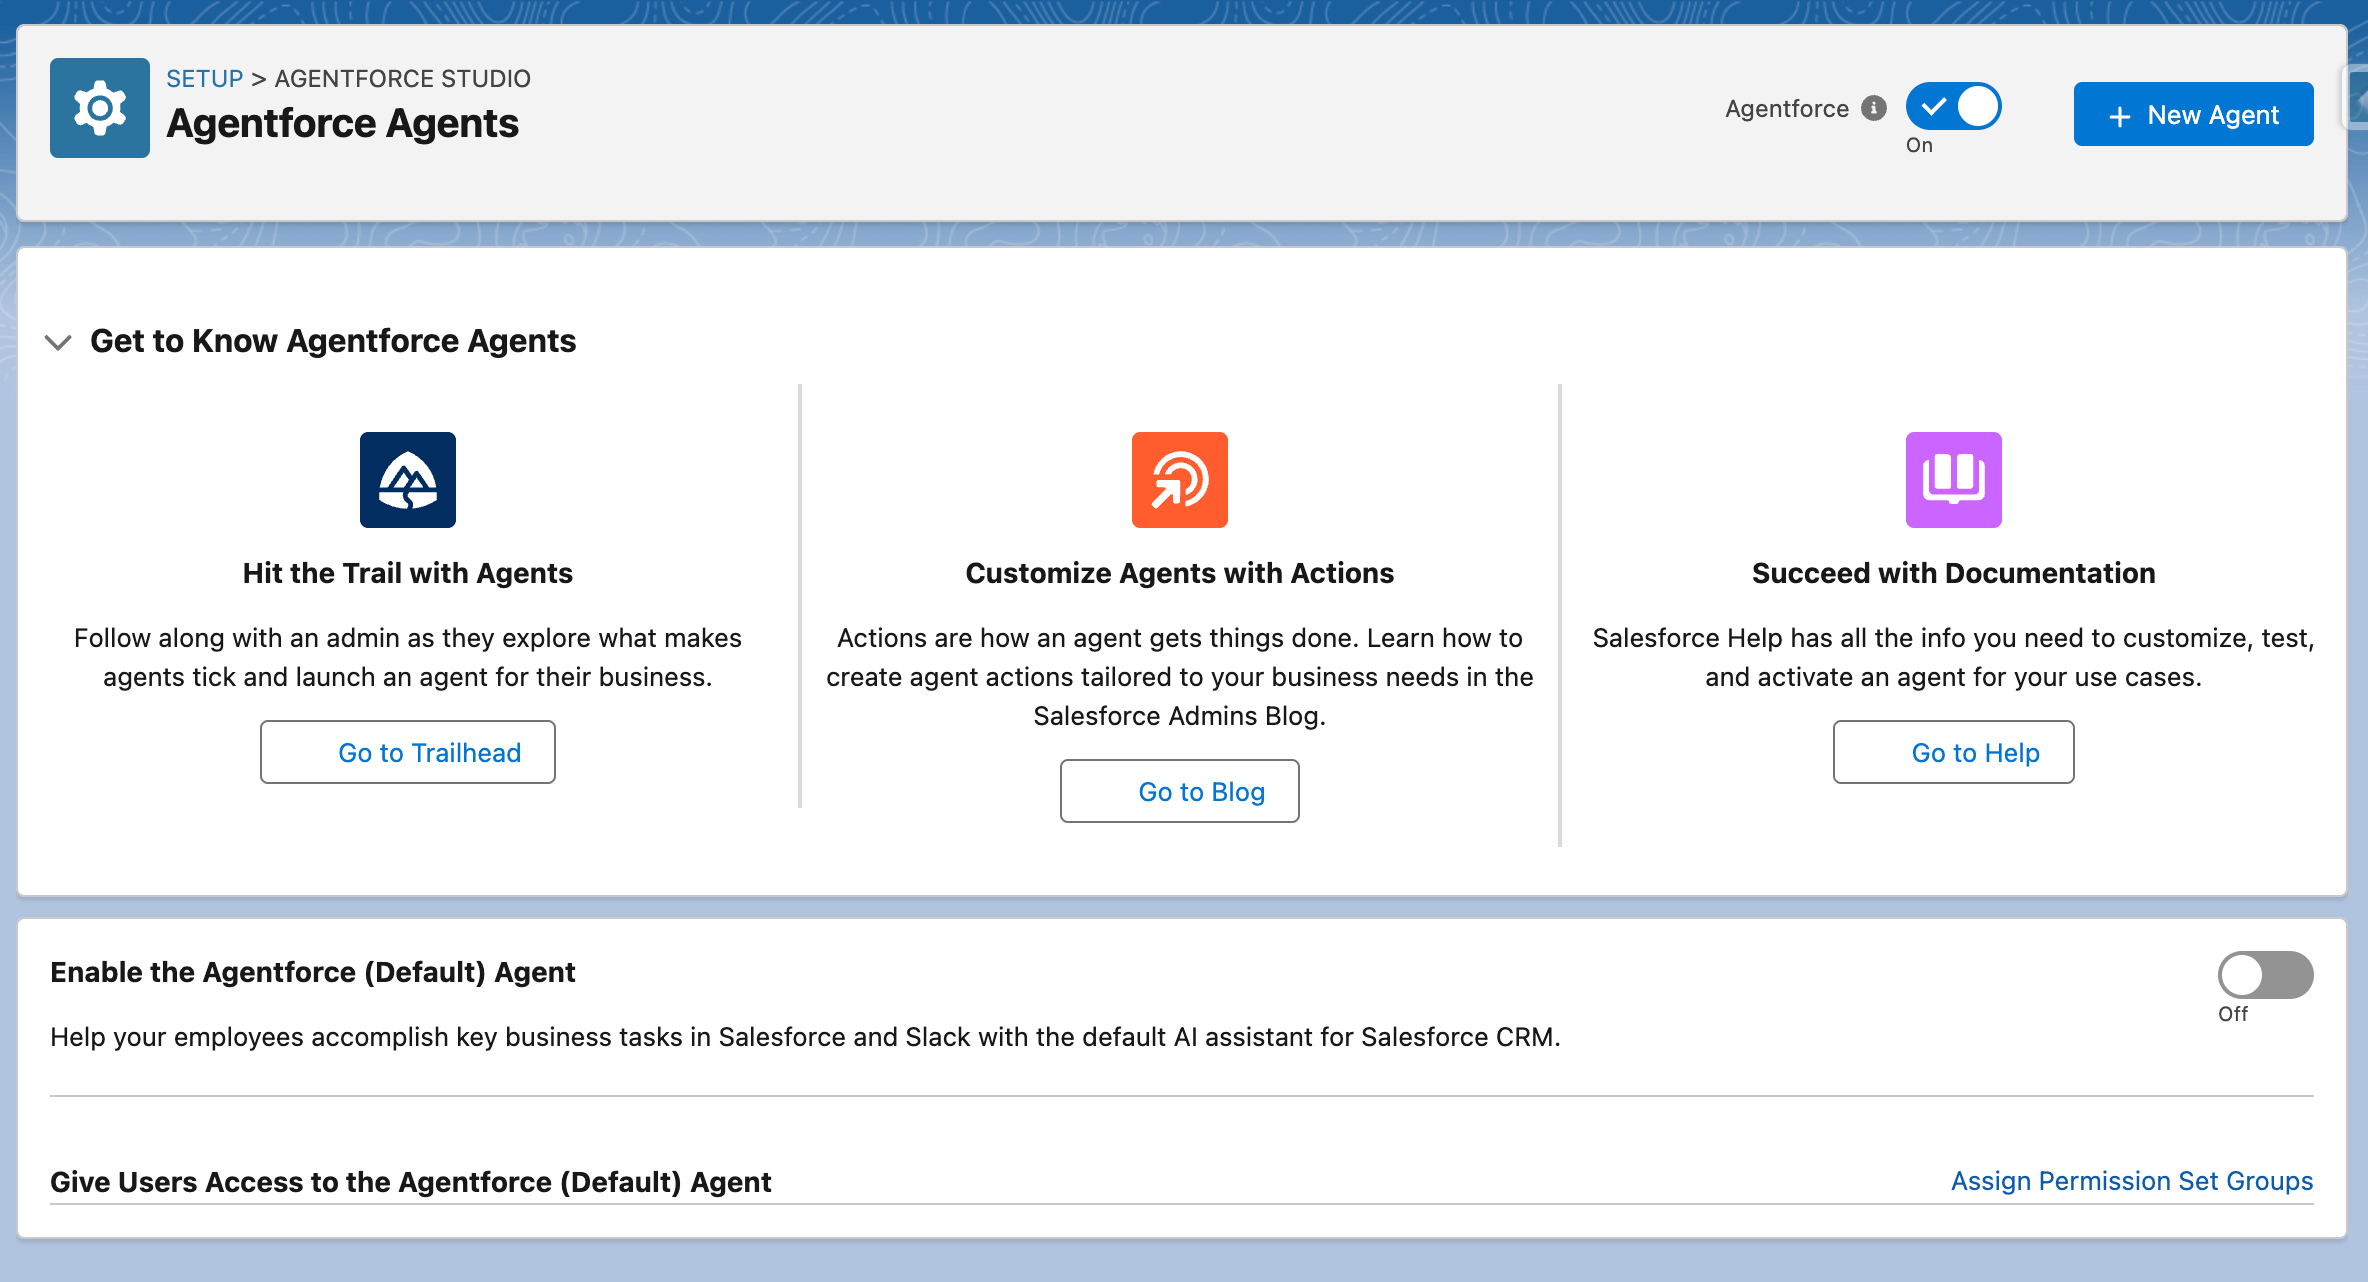
Creating Our Agent
- If you’re not already there, go to setup and search for Agentforce Agents then click on it
- On the Agentforce Agents page, click + New Agent in the upper right
- You’re given a few options on this page, but for now select Create with Gen AI and enter this prompt to create the agent:
This agent will help triage cases for The Best Bean, a coffee shop that serves fresh coffee and sells locally roasted beans. When a new case is submitted the agent will be called by a record-triggered flow and should attempt to categorize the case into one of four categories:
- Coffee Bean Order
- Coffee Bean Shipment Status
- Question about Locations or Hours
- Coffee Recommendation Request
Salesforce will now attempt to fill in some of the information about the agent based on our prompt, but it doesn’t always work well. Here’s what it filled in for me:
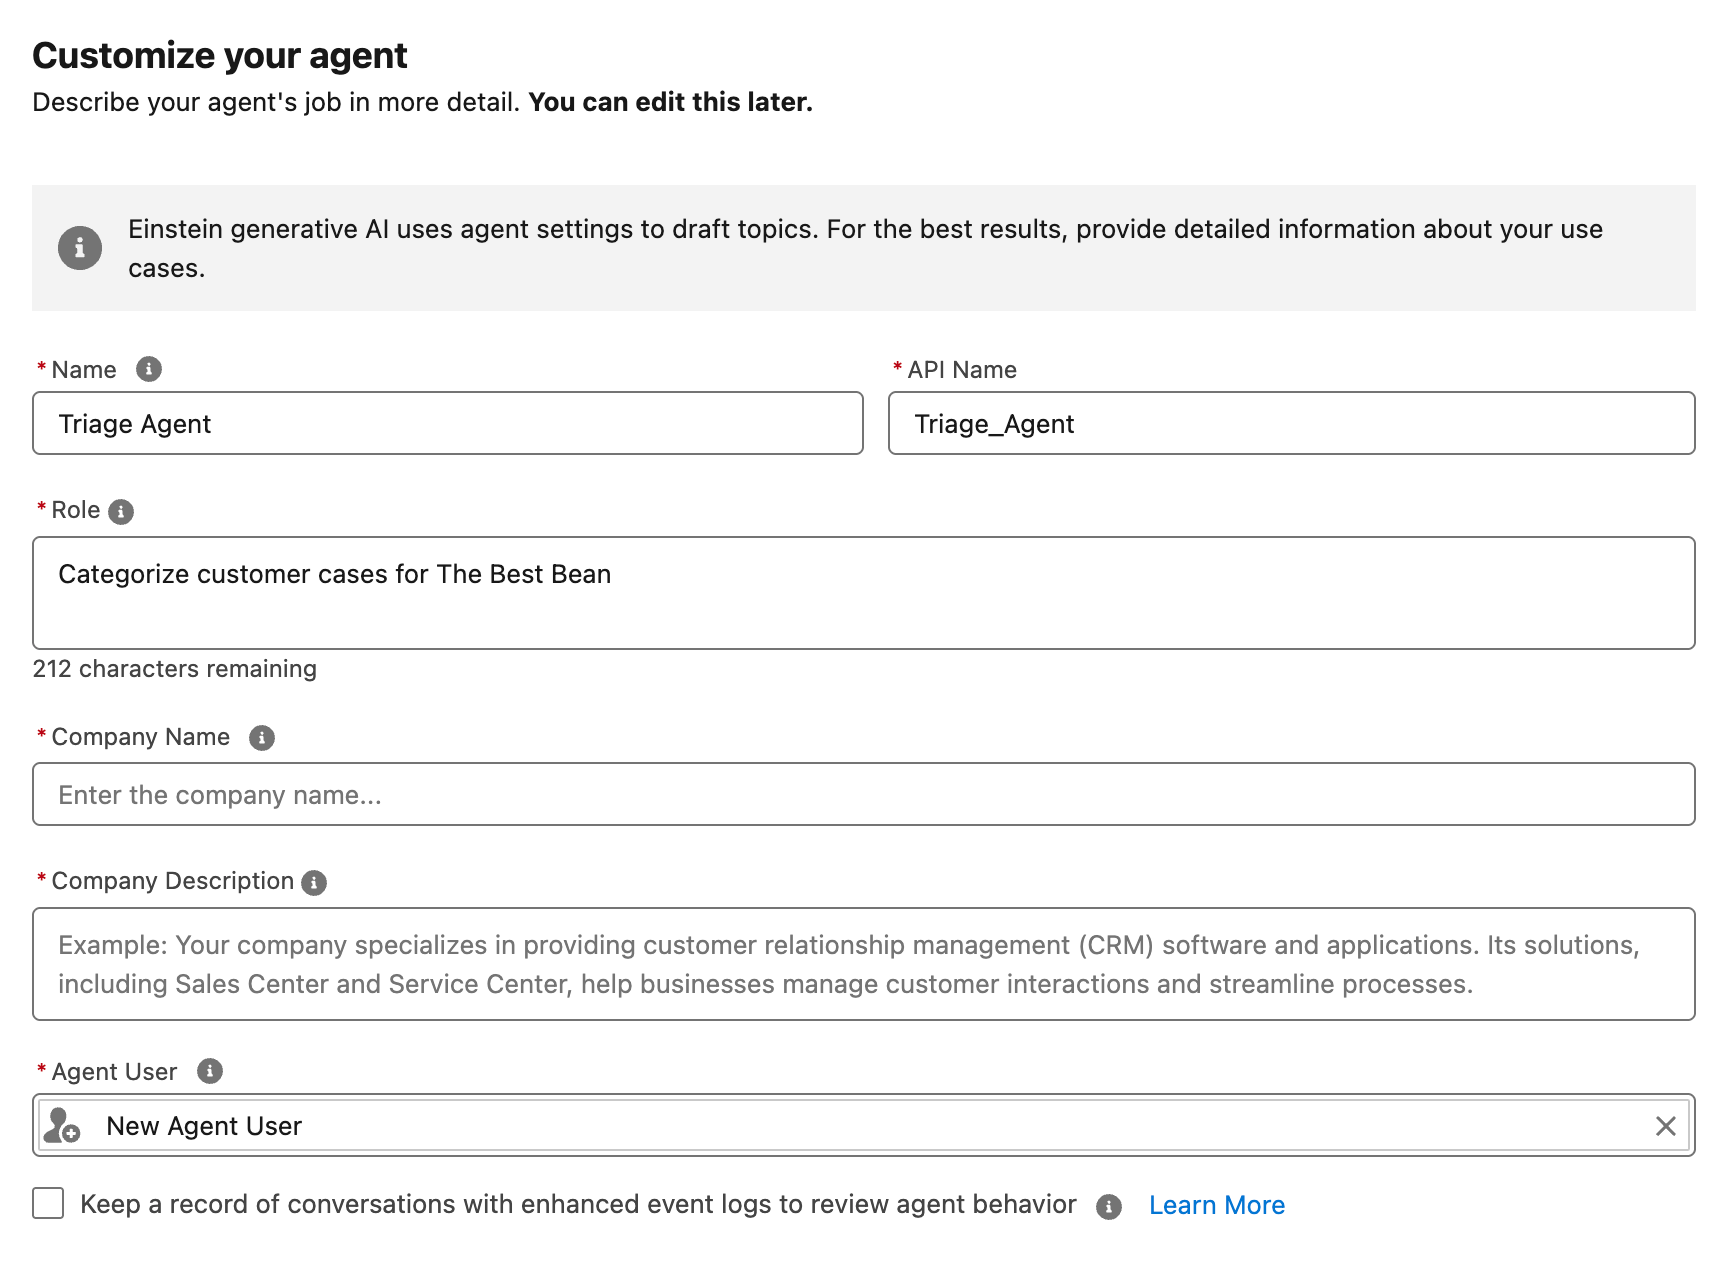
I guess Salesforce tried it’s best, but I filled in the blanks and cleaned things up a little: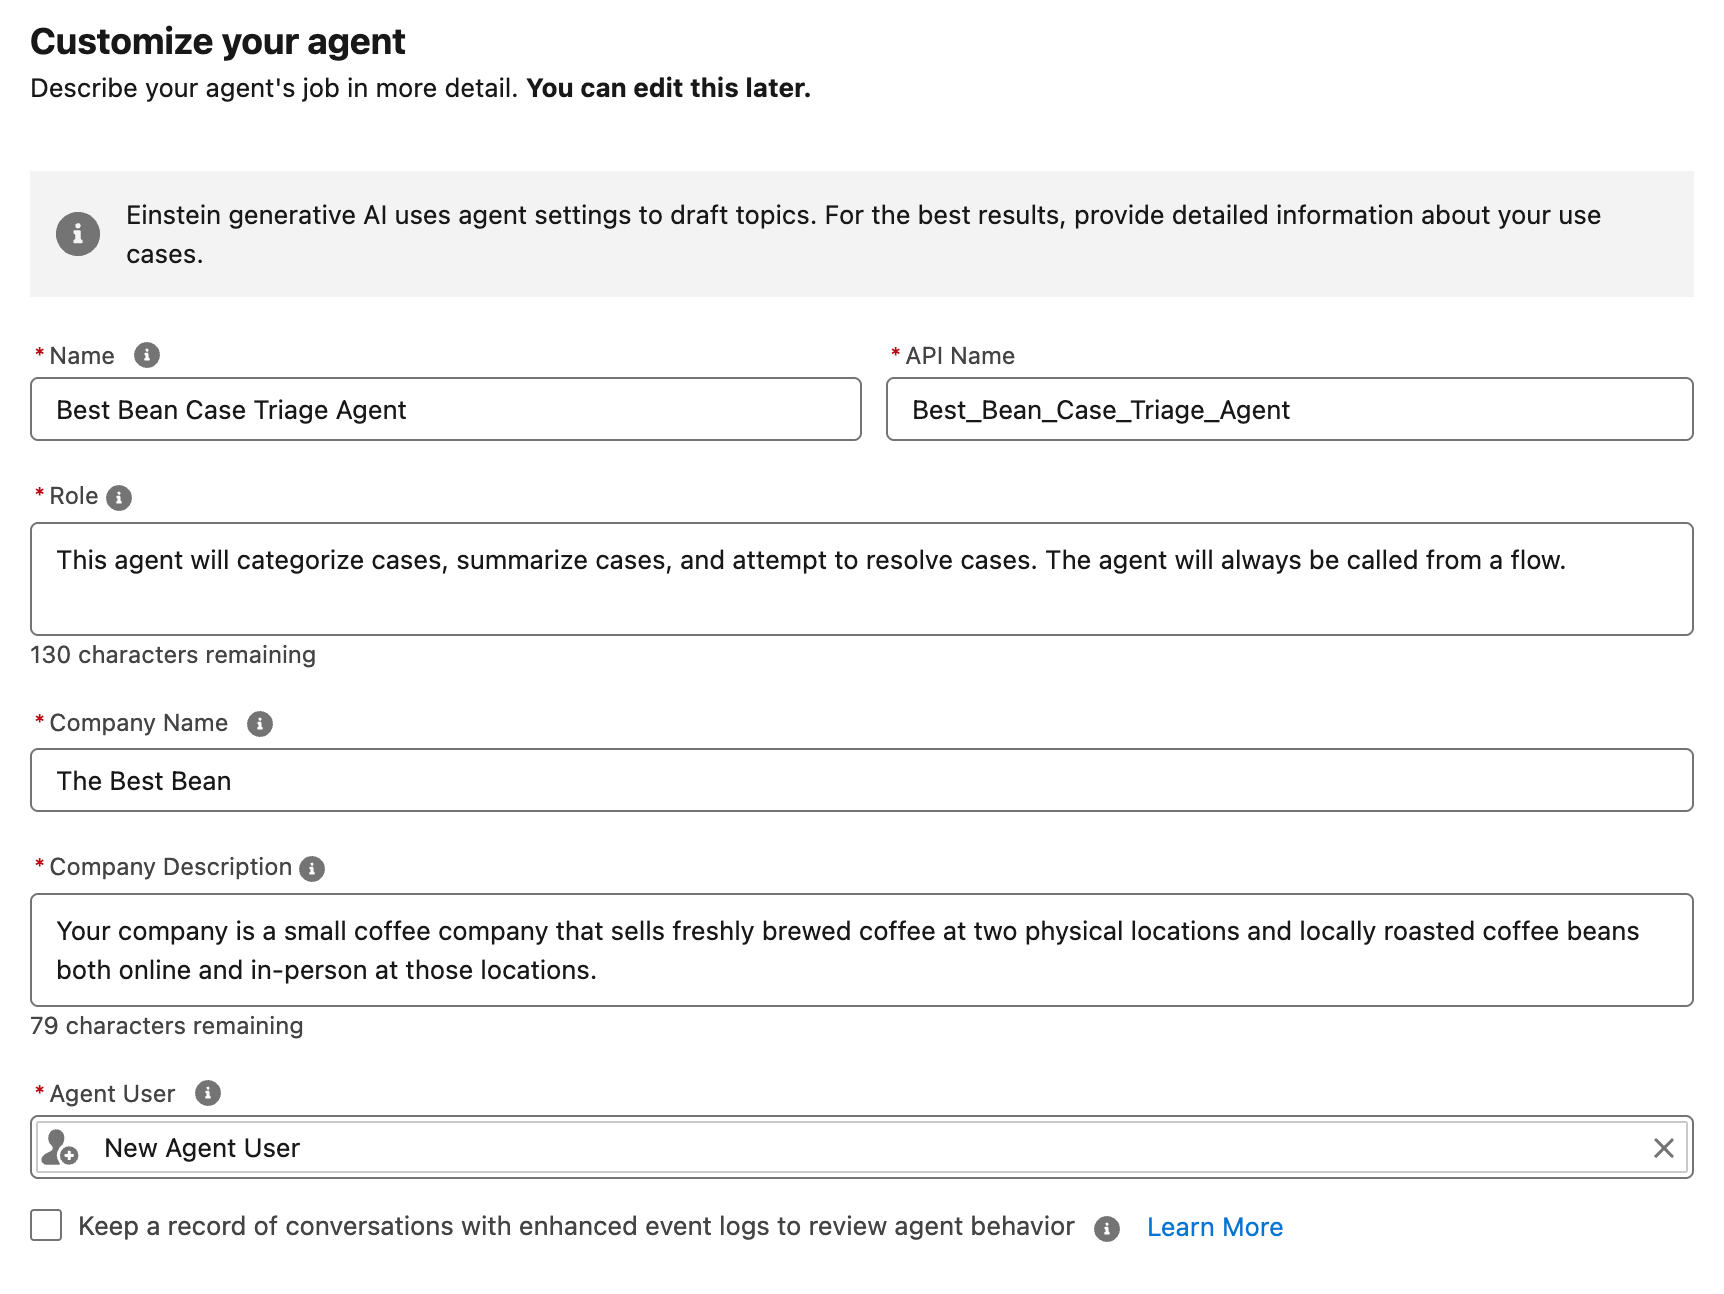
Click Next to go to the topics page
Salesforce has added AI generated topics based on our prompt in step 3, but for our purposes we want to build our own topics from scratch so I’ll click Added next to each topic to remove them and then click Next
We’ll skip the Add Data step and click Create
Adding Topics
- We’re going to be building our topics from scratch, so if Salesforce automatically added topics for you like they did for me click the arrow next to each topic and then click Remove from Agent
- Click the New button in the topics section and select New Topic
- You can enter a prompt in the What do you want this topic to do? section, but we’ll skip that and build the topic ourselves so just click Next
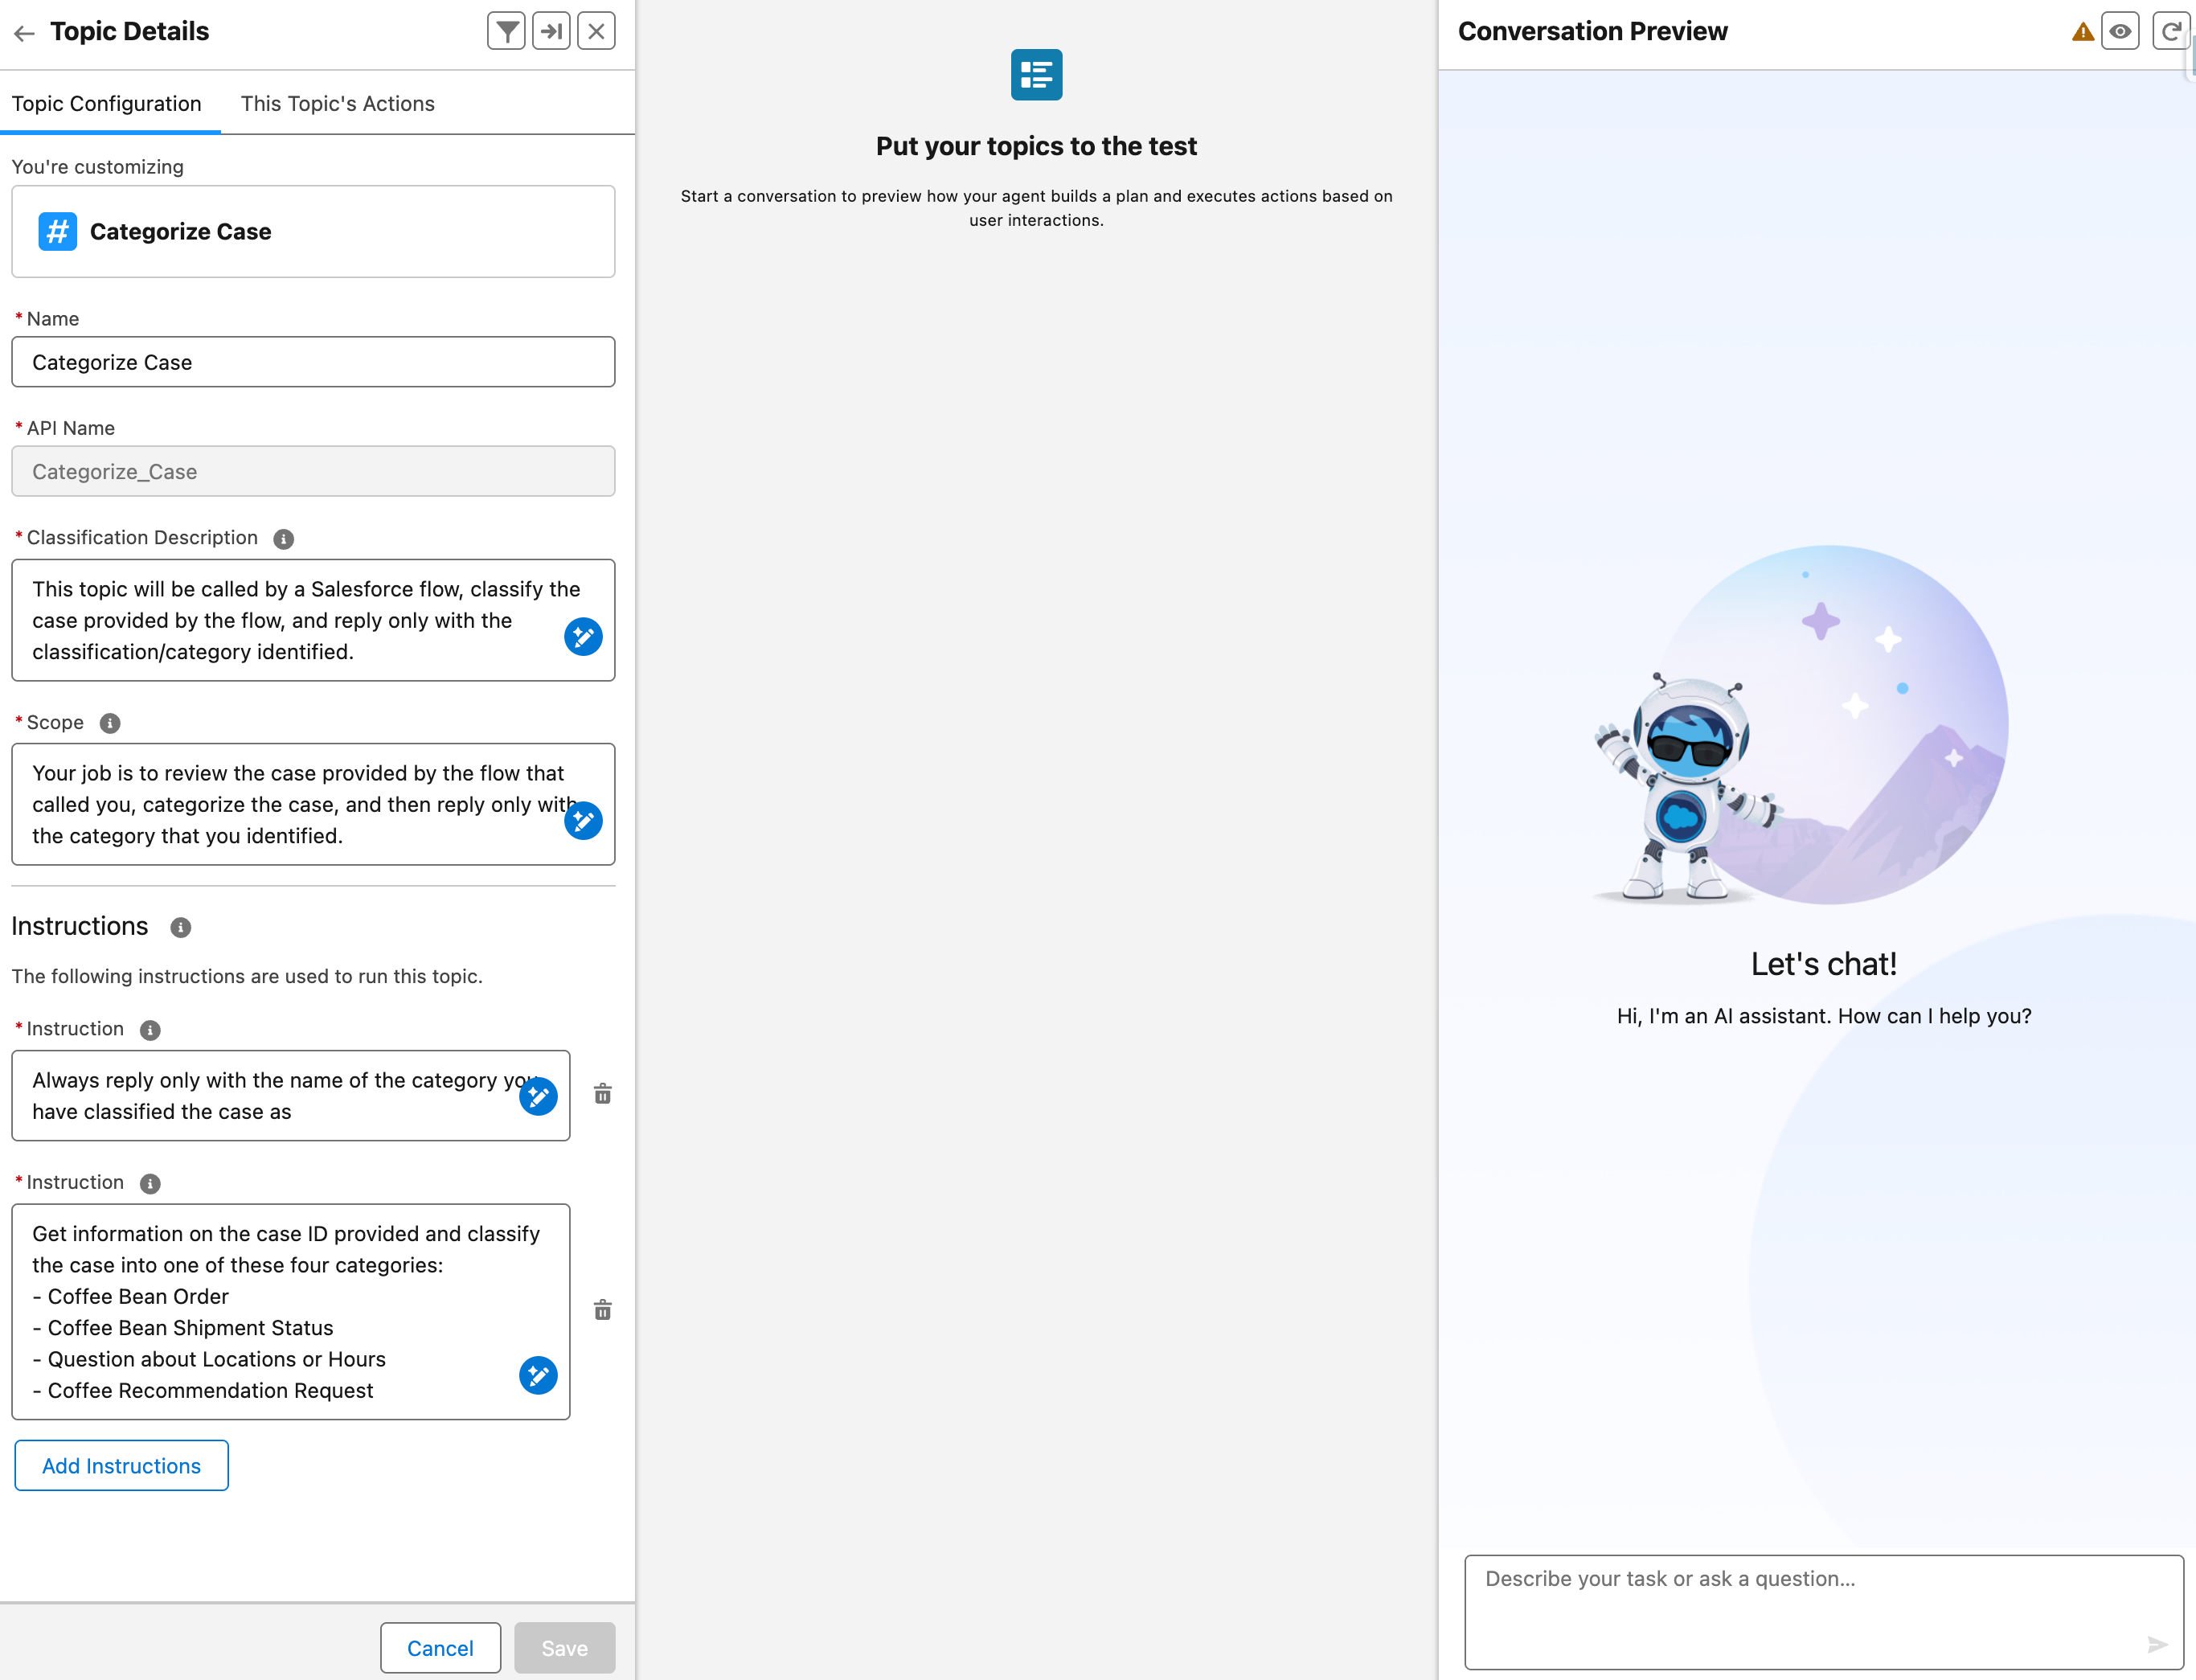
- Fill in the fields on the next page with the information below. Note that the Classification Description is what the agent considers when trying to determine what topic a request is about so it’s important to make sure that your classification descriptions are clear and don’t overlap between topics.
| Field | Content |
|---|---|
| Topic Label | Categorize Case |
| Classification Description | This topic will be called by a Salesforce flow, classify the case provided by the flow, and reply only with the classification/category identified. |
| Scope | Your job is to review the case provided by the flow that called you, categorize the case, and then reply only with the category that you identified. |
| Instructions - Instruction 1 | Get information on the case ID provided and classify the case into one of these four categories:- Coffee Bean Order- Coffee Bean Shipment Status- Question about Locations or Hours- Coffee Recommendation Request |
| Instructions - Instruction 2 | Always reply only with the name of the category you have classified the case as |
Click Next, you’re now prompted to select actions that the agent can use when responding to a query about this topic. We’re going to make our own actions so skip this step for now and click Finish
Click on Categorize Case in the list of topics to see the topic that we just created
While we’re here, let’s create a second topic that allows the agent to summarize a case as well. Click the back arrow in the upper left and then select New > New Topic
Just like the last topic we’ll skip the optional description and click Next
I added the information below for our second topic. Note that I added an instruction to never include the case ID in the agent’s response to prevent that data from leaking into our summary. It doesn’t matter as much for our use case because these responses will only be used internally for now, but it’s important to put guardrails in place to prevent the agent from sharing data that should be kept private.
| Field | Content |
|---|---|
| Topic Label | Summarize Case |
| Classification Description | You’ll be called from a Salesforce flow and asked to summarize a case based on the provided case ID. |
| Scope | Your job is to get information about the case ID provided, summarize the case based on that information, and reply only with your summary. |
| Instructions - Instruction 1 | When you’re provided a case ID, get details about the case and then summarize it. Reply only with your summary of the case. |
| Instructions - Instruction 2 | Never include the case ID in your response. |
- Click Next, then skip the actions page and click Finish
- With our first two topics created, it’s time to build out some actions for our agent so that it can interact with our CRM data!
Building Agent Actions
Salesforce has a lot of pre-built actions for agents, but for this we’ll build our own actions instead. The agent needs to be able to get information about a case record in order to function for either of the topic we’ve created so we’ll build an action that allows the agent to get a case by the record ID and then add that action to both of our topics.
- We’re going to use a flow as the base for our action, so go to setup and search for Flows and then click on it
- Select New Flow in the upper right
- Select Start From Scratch and then click Next
- We’re going to let the agent trigger this flow as needed so select Autolaunched Flow (No Trigger) and then click Create
- We’ll need to allow the agent to pass a case ID to this flow and have the flow pass the case record back to the agent to click the sidebar/toolbox icon in the upper left and create two variables:
| Resource Type | API Name | Description | Data Type | Object | Available for Input | Available for Output |
|---|---|---|---|---|---|---|
| Variable | CaseId | The ID of the Case record to get. | Text | N/A | ✅ | ❌ |
| Variable | CaseRecord | The Case record found based on the Case ID. | Record | Case | ❌ | ✅ |
Now that we have our variables created, we can finish building out our flow. Add a Get Records element right after the start of the flow and configure it like this:
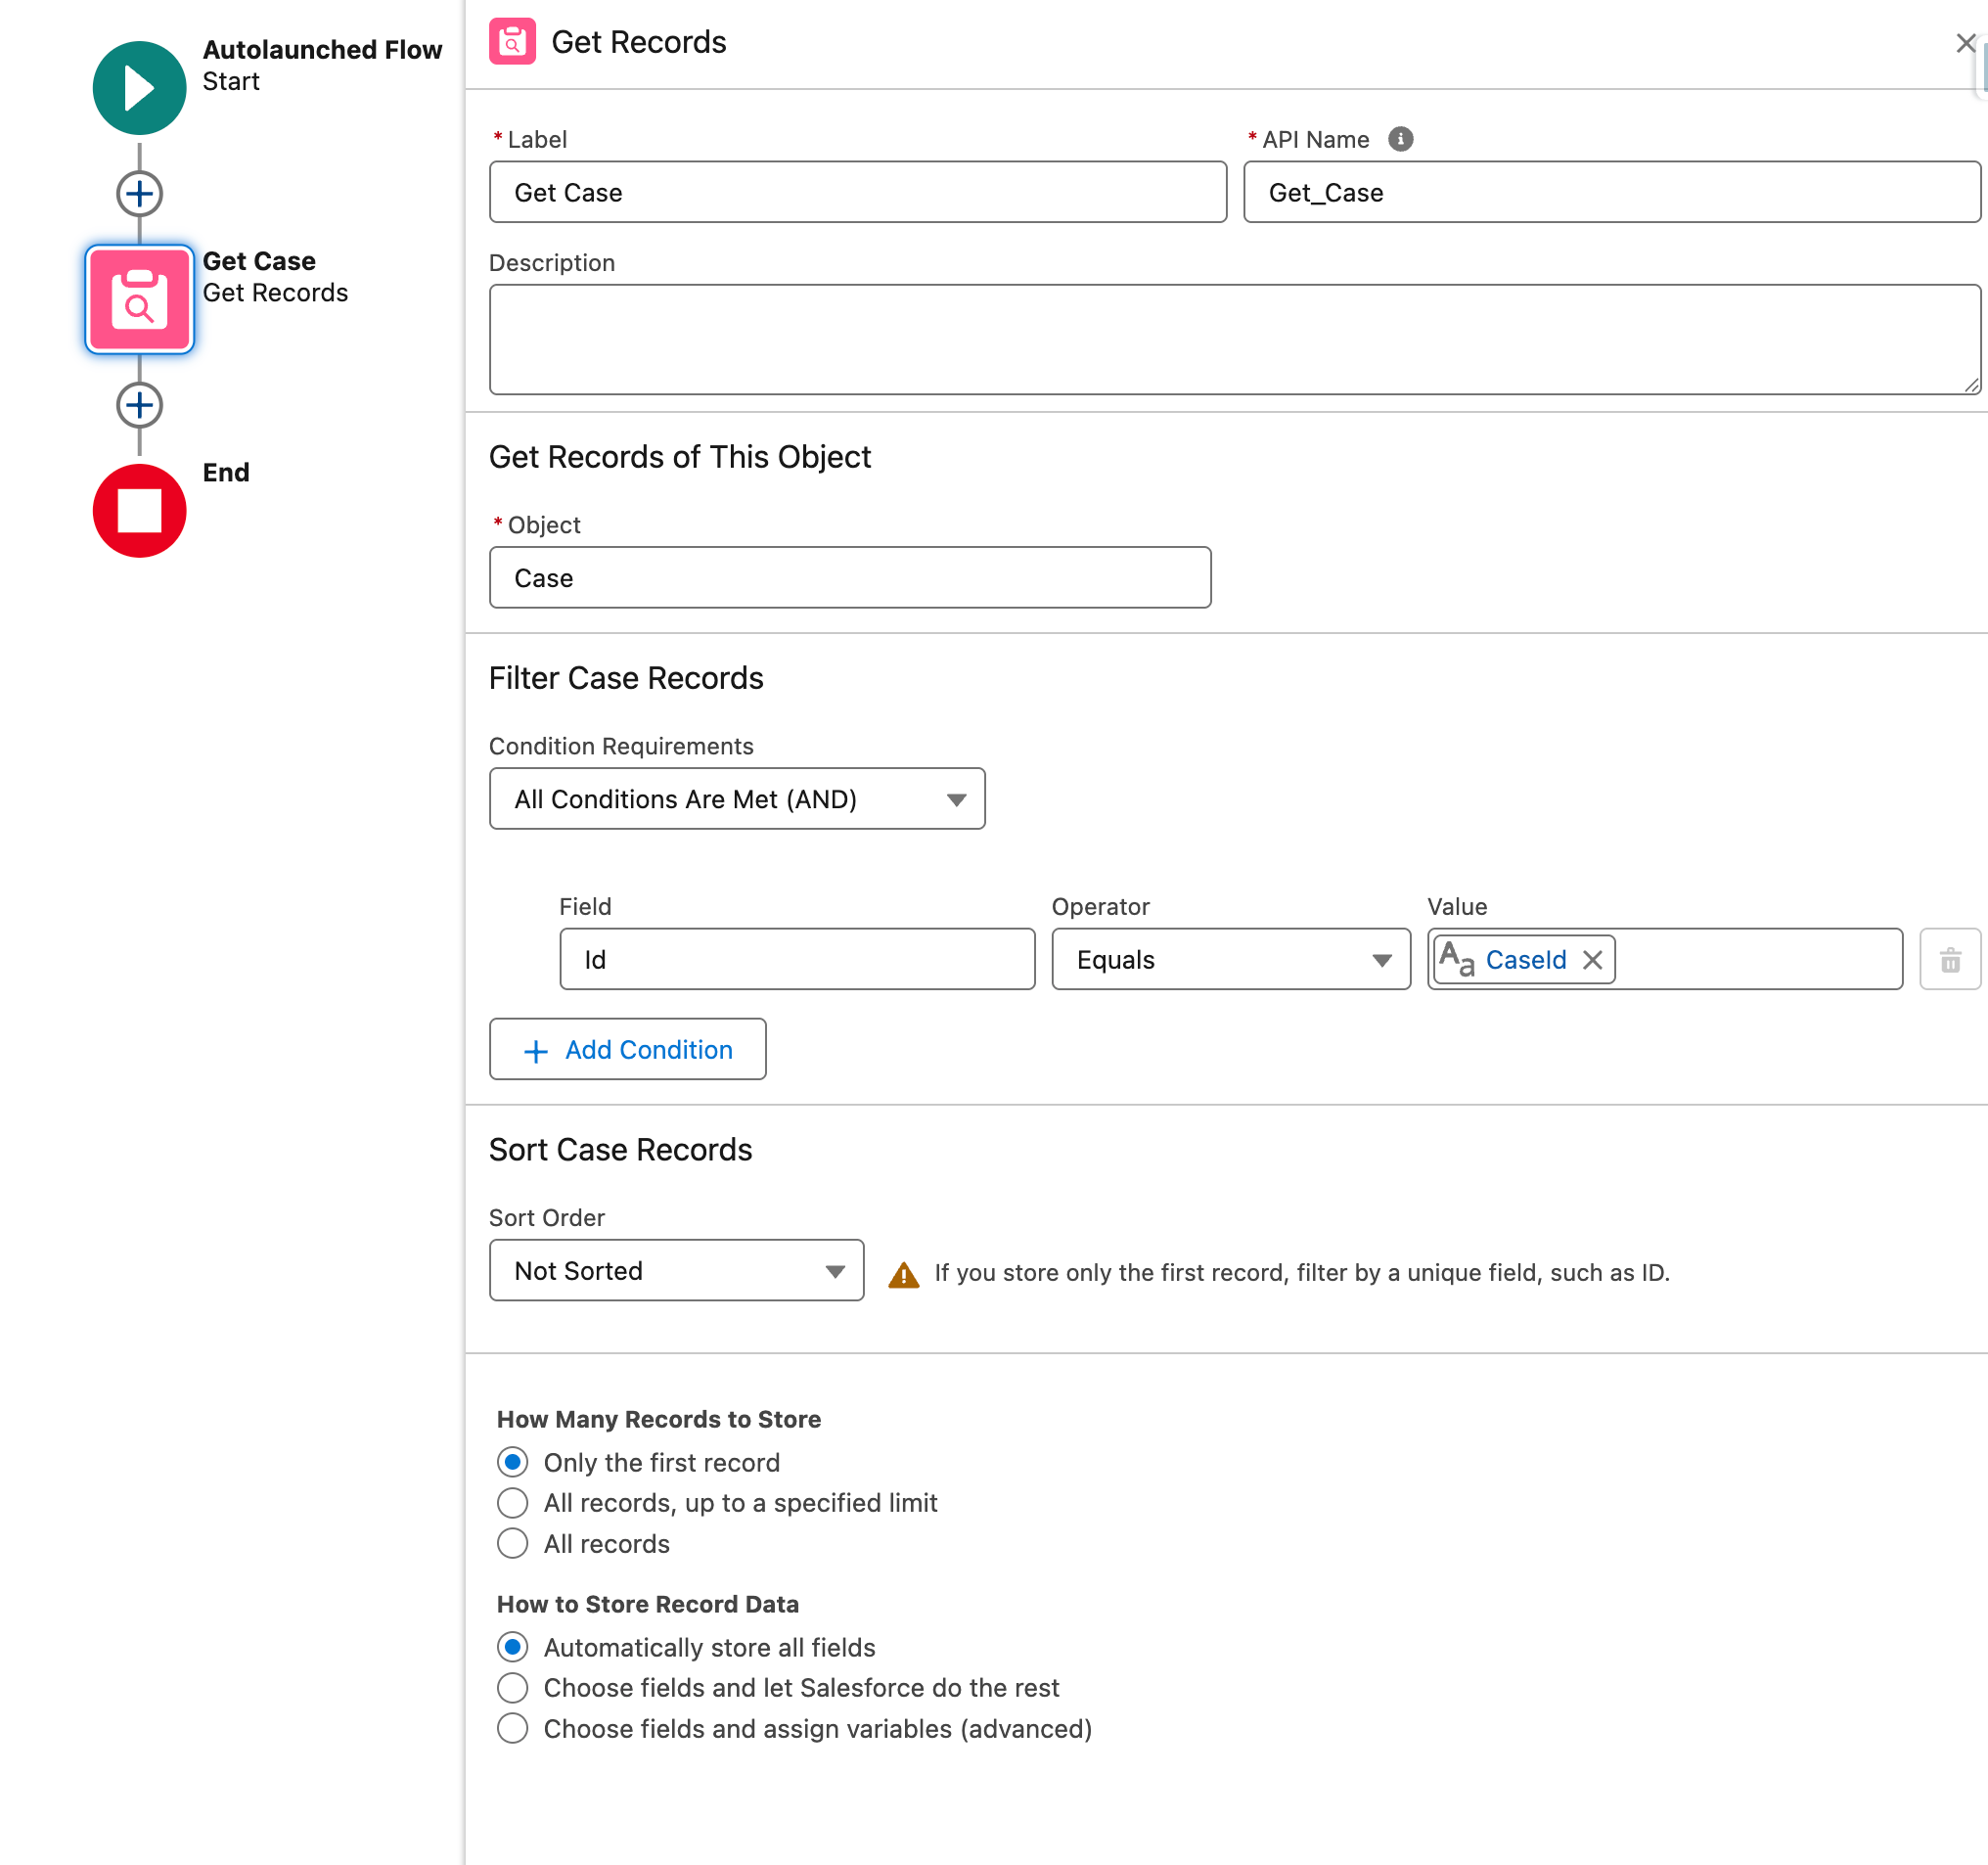 ✅
✅Next, add an Assignment action after your Get Case action and configure it like this:
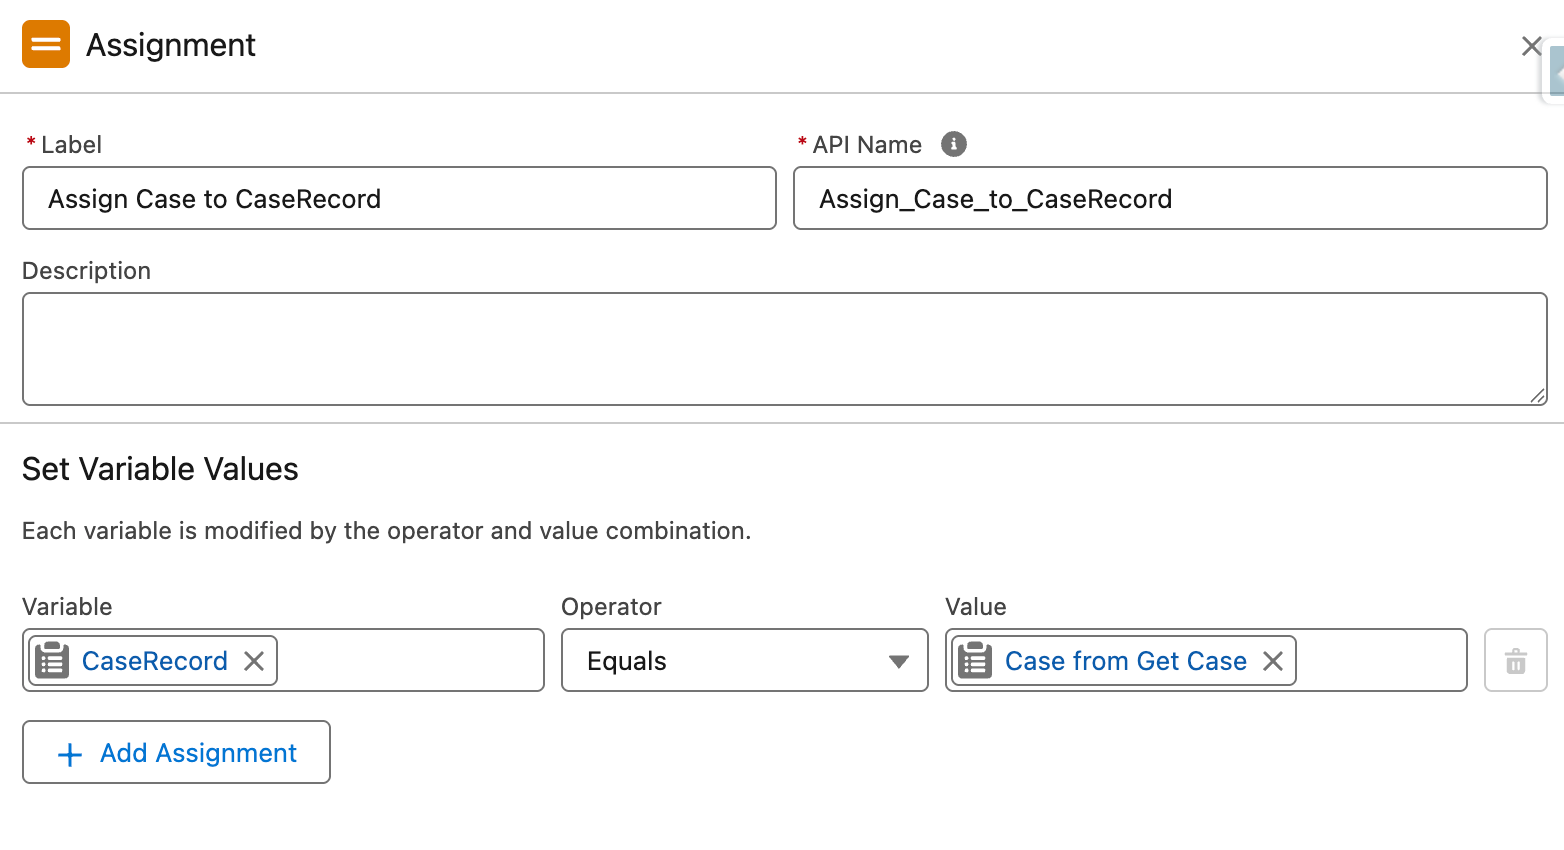
That’s it! Our flow is complete! Click Save in the upper right-hand corner of the screen and name the flow Agentforce Get Case, then click Save again
Click Activate in the upper right
Adding Actions to Topics
Now that we have our flow created, we’re ready to add it as an action for both of our topics.
- Search setup for Agentforce Assets and click on it
- Select the Actions tab at the top of the page and click + New Agent Action in the upper right
- For Reference Action Type select Flow and then select the flow that we just created from the Reference Action dropdown. Leave the other fields at their defaults and click Next
- Now we need to provide instructions so that agents will know how to use our action:
| Field | Content |
|---|---|
| Agent Action Instructions | Use this action to get record details for a Case based on the Case ID. |
| Show loading text for this action | Unchecked ❌ |
| Input > Instructions | The ID of the Case record to get. |
| Input > Require input | Checked ✅ |
| Input > Collect data from user | Checked ✅ |
| Output > Instructions | The Case record found based on the Case ID. |
| Output > Filter from agent action | Unchecked ❌ |
| Output > Show in conversation | Checked ✅ |
- Click finish and search for Agentforce Agents in setup and then click on it
- Click the arrow next to our agent and select Open in Builder
- Select the Categorize Case topic and then select This Topic’s Actions at the top
- Select New > Add From Asset Library and search for Agentforce Get Case, then select the checkbox next to the action we created and click Finish
- Sometimes (or even often) the action won’t show up after you click Finish. That’s okay, refresh a few times and if it still doesn’t show up follow steps 7-8 to add it again
- Repeat steps 7-9 for the Summarize Case topic
Configuring Agent Permissions
Because this is a Service Agent, it won’t have access to our CRM data by default so we need to create a permission set that allows it to read and update Cases.
- From Setup, search for and click on Permission Sets
- Agentforce has automatically created a permission set based on the name we picked for our agent so click on the Best_Bean_Case_Triage_Agent Permissions permission set
- Click on Object Settings and then find and click on the Cases object
- Click Edit at the top of the page
- Since we only need our agent to read case data and we don’t have any sensitive fields that we need to hide, check off Read under Object Permissions and check off Read Access for all fields under Field Permissions, then click Save
Testing the Agent
Now that we have our actions and topics all set up we can test the agent and make sure it’s giving us the responses that we want! I created a test case that we can ask it about, but feel free to change things up in your environment and make a case about something else.
| Field | Content |
|---|---|
| Status | New |
| Case Origin | |
| Subject | Coffee Recommendation |
| Description | Hello! I’d like to try your locally roasted beans, but I’m not sure which ones I should get. I recently moved into the area and I’d been buying Columbian Supremo in the past but I’m not sure if I should branch out. Can you help? |
| I’ll take the case ID from the URL so that we can give it to our agent: | |
 |
Go to Setup and search for Agentforce Agents, then click on it, select the arrow next to our agent, and select Open in Builder
Try asking the agent something like “Categorize case ID 500gL0000053J6TQAU” and see how it responds
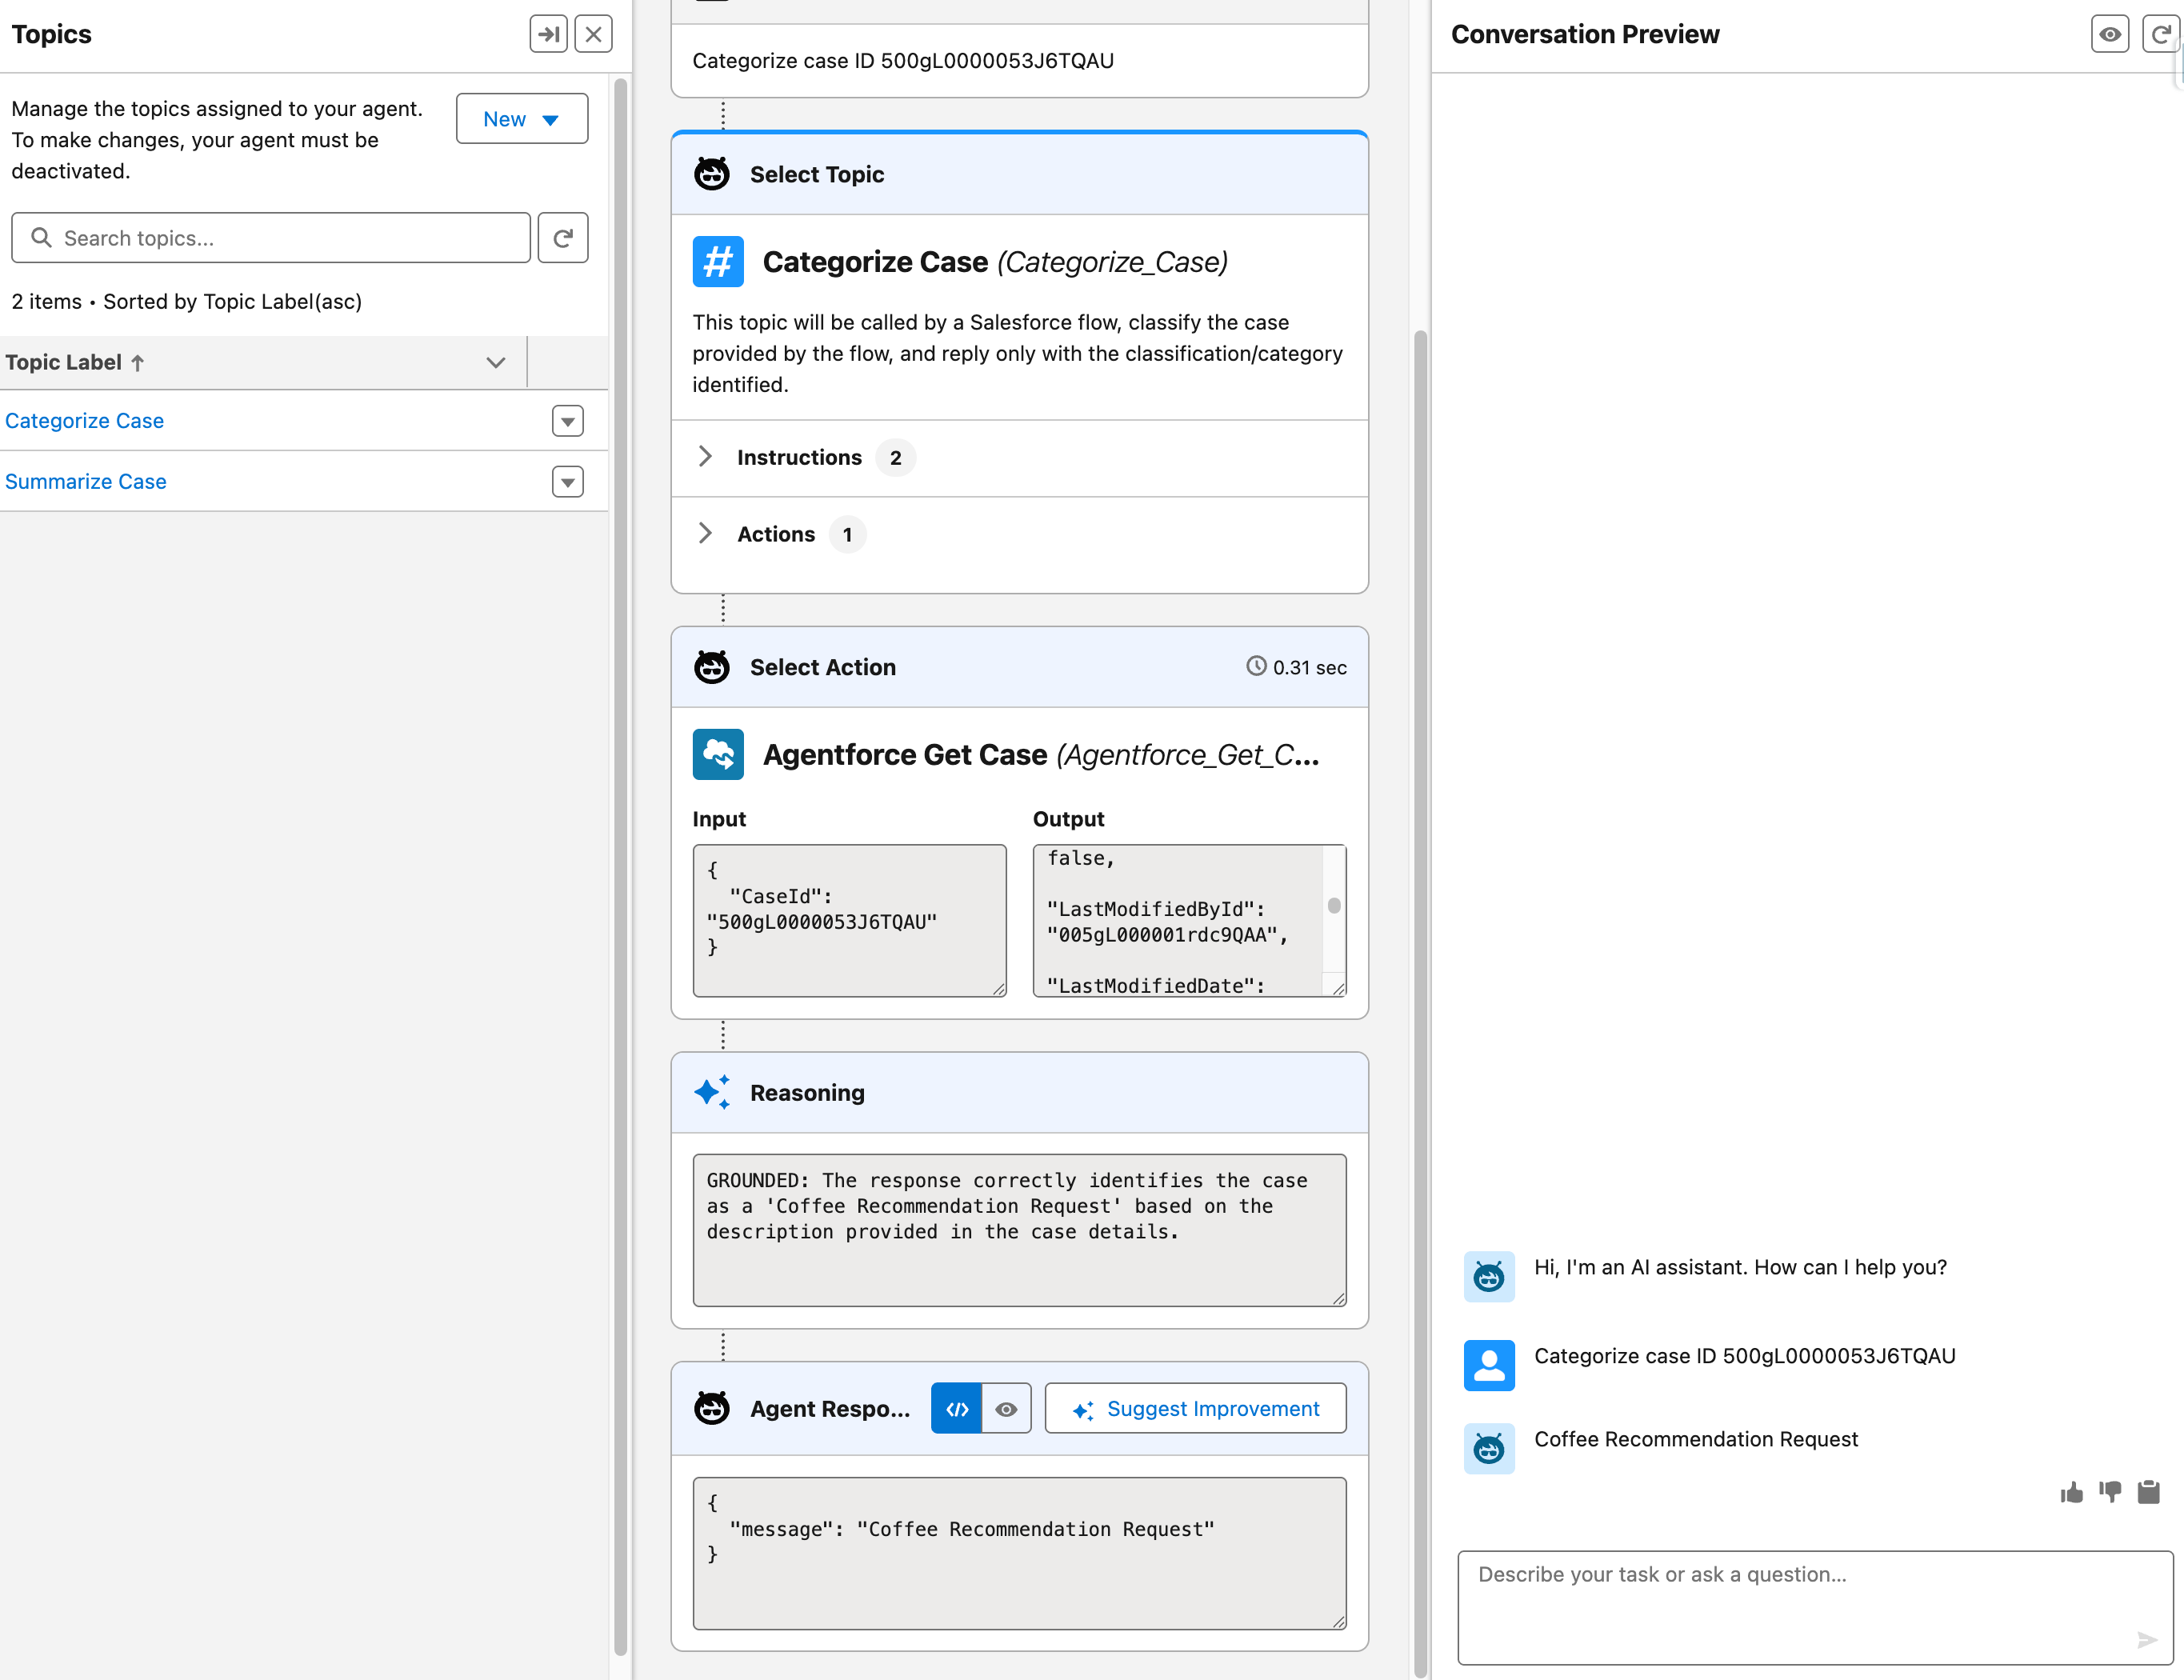
Great! We can see that our agent picked the correct topic and replied with one of the four topic options that we gave it! Now let’s see if it will summarize the case for us too
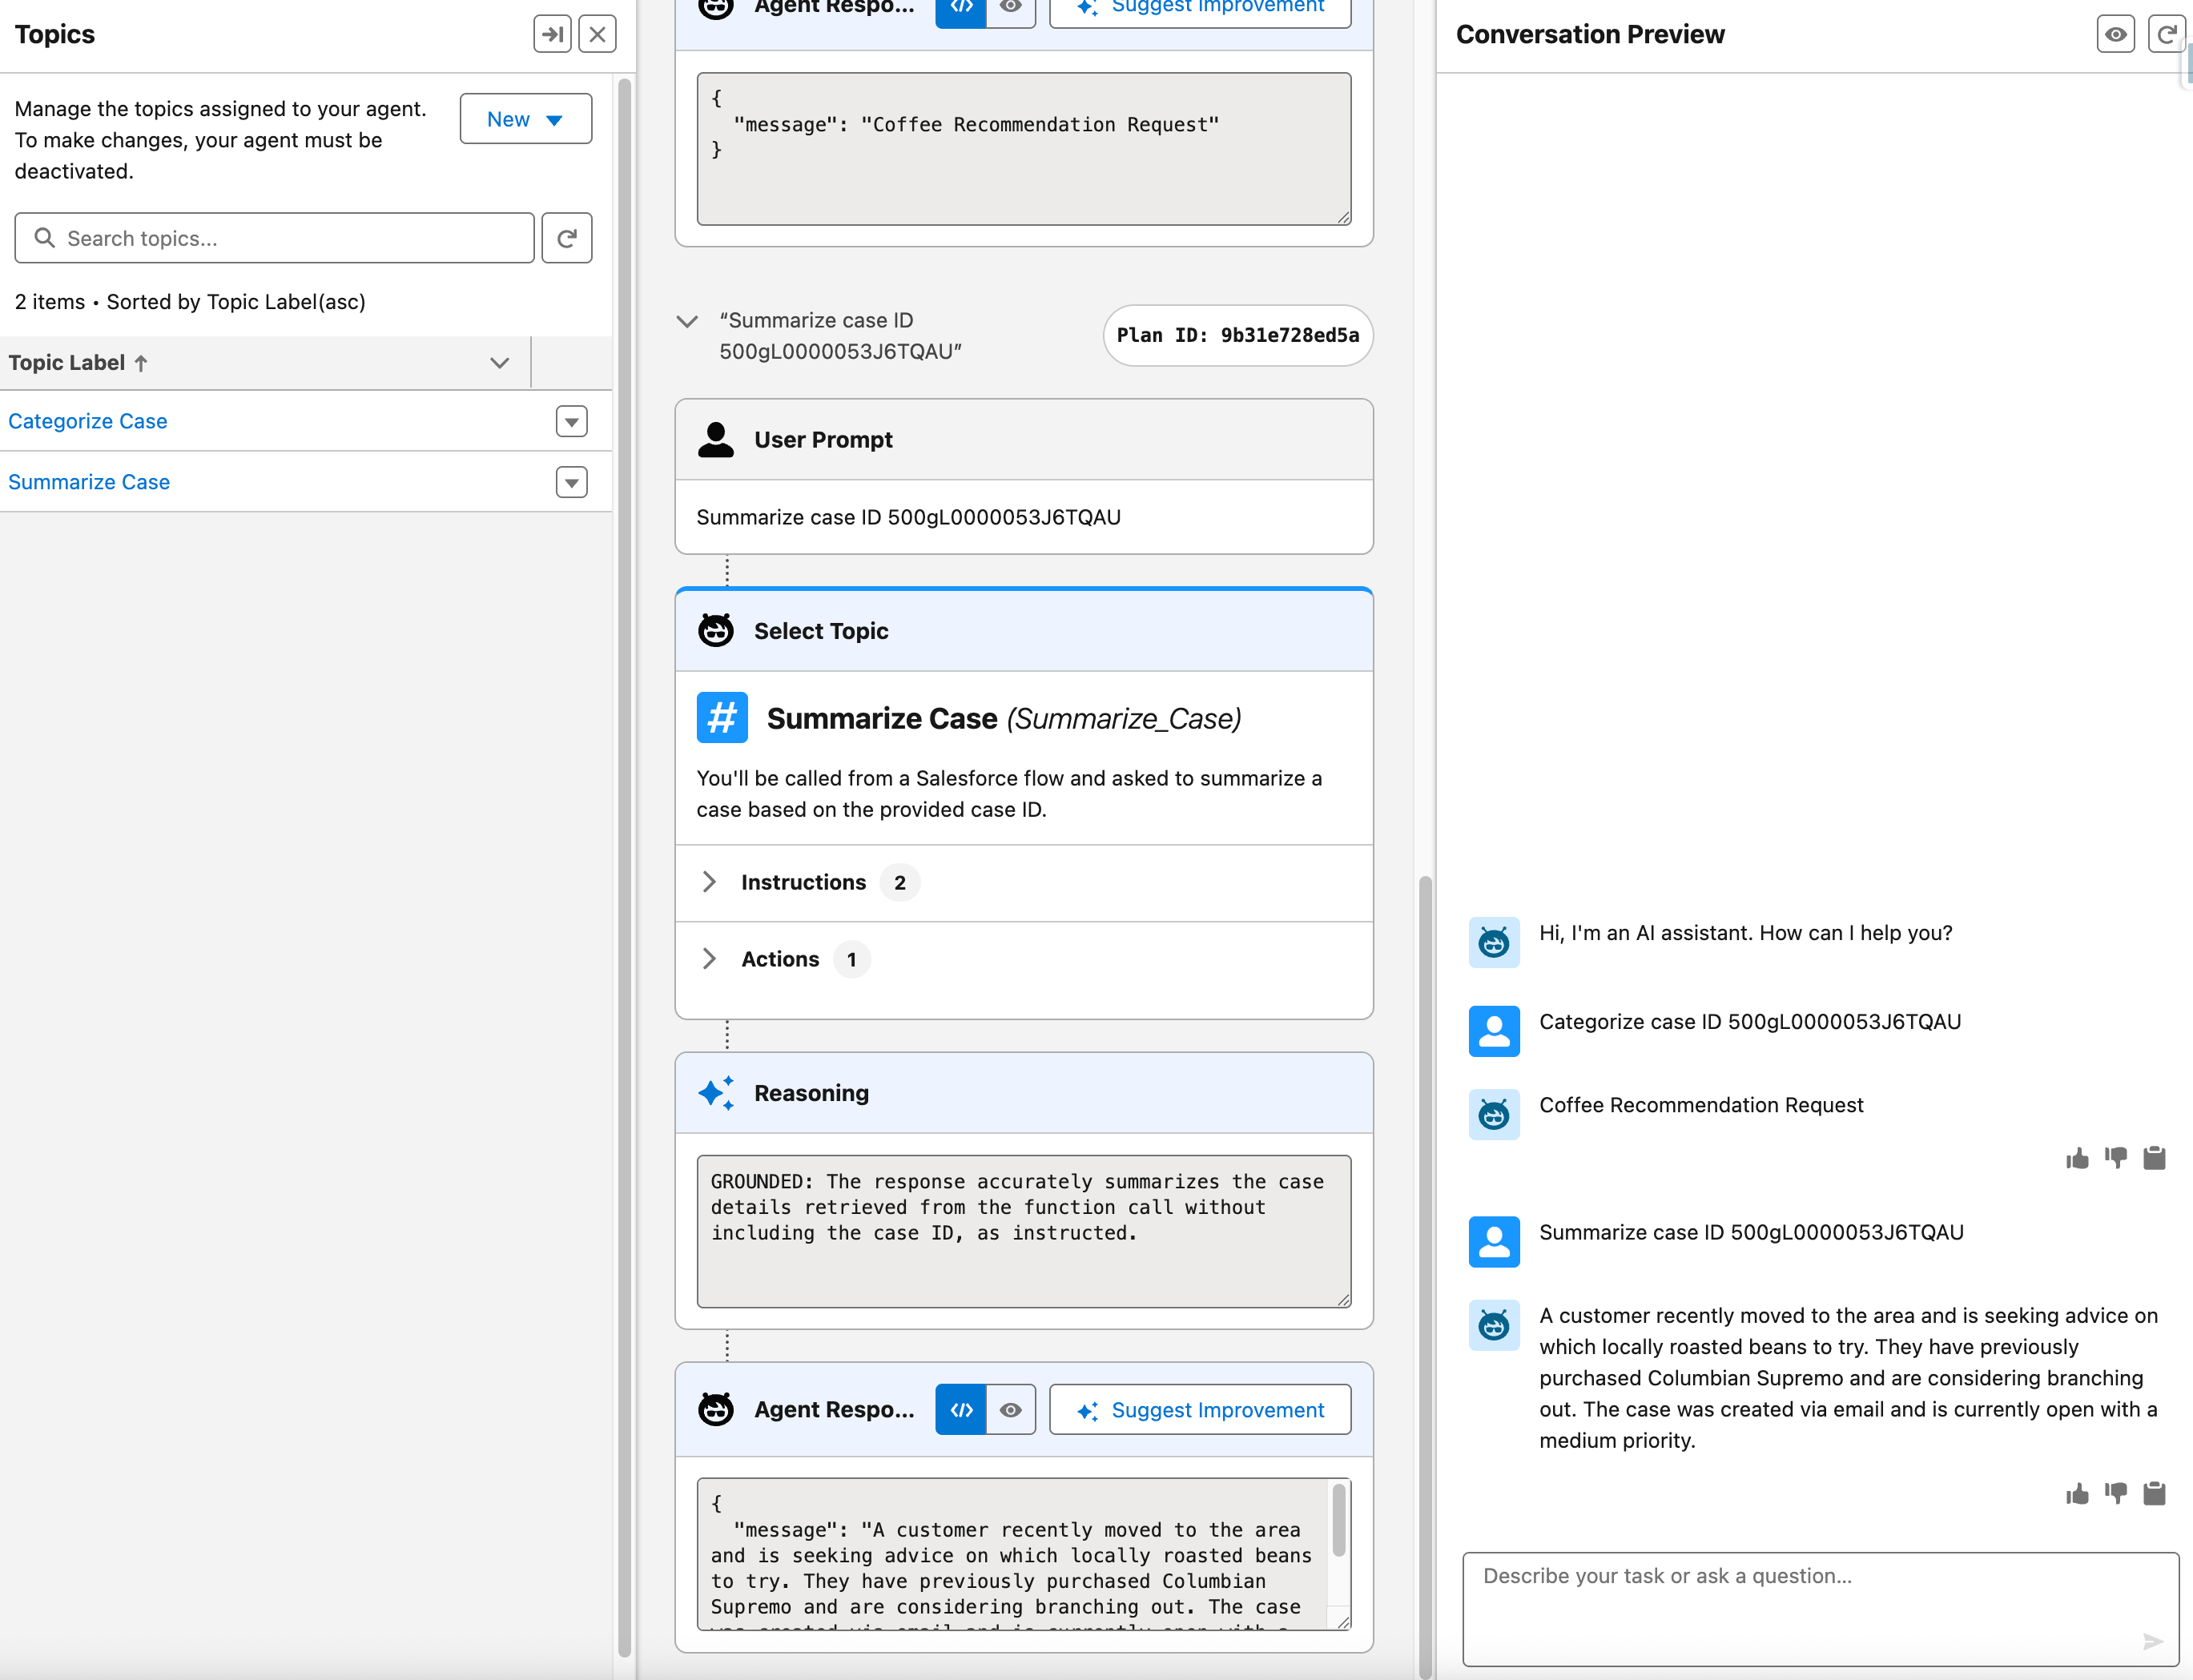
Perfect! Our agent is categorizing and summarizing cases just like we wanted! Click Activate in the upper right to activate the agent and then let’s tie everything together with a record triggered flow.
One note here, there is a Testing Center included with Agentforce which allows you to test many prompts and responses at once by uploading a CSV file. That isn’t the focus of today’s post, but it’s something I’ll touch on in the future.
Tying it All Together - Record Triggered Flow
Now that we know our agent is responding how we want it to let’s tie everything together with a record-triggered flow so that the agent is triggered every time a new case comes in.
Go to Setup and then search for and click on Flows
Click New Flow in the upper right
Select Start From Scratch and then click Next
We want this flow to run every time a new case is created so select Record Triggered Flow and then click Create
In the Configure Start section, select Case as the object triggering the flow and leave the trigger set to A record is created
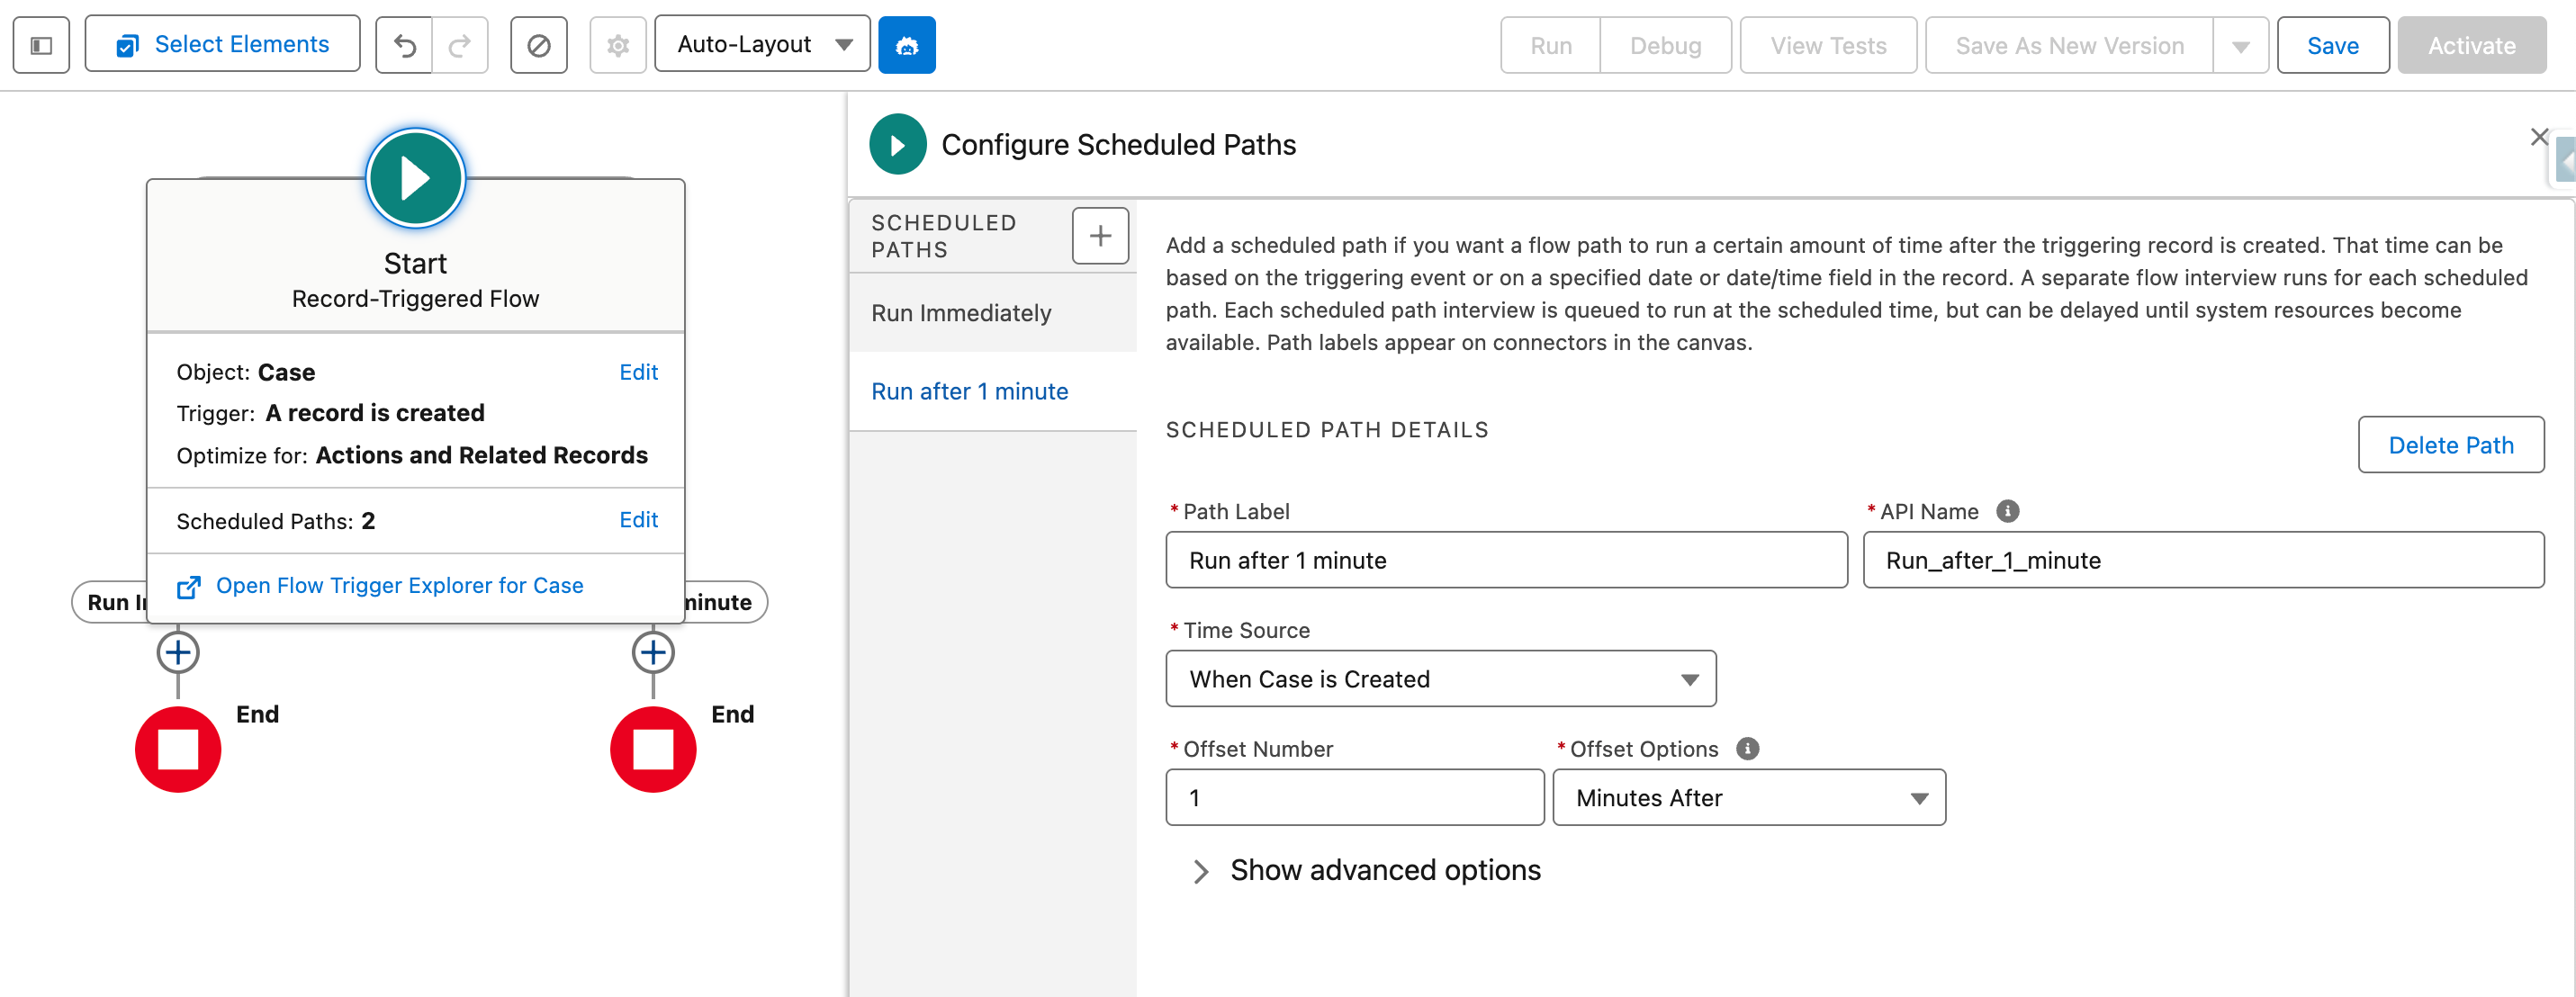
Unfortunately calls to Agentforce agents can’t happen in paths that run immediately so we’ll need to add a scheduled path to our flow. Click Add Scheduled Paths (Optional) on the start element
Update your new scheduled path with these settings:
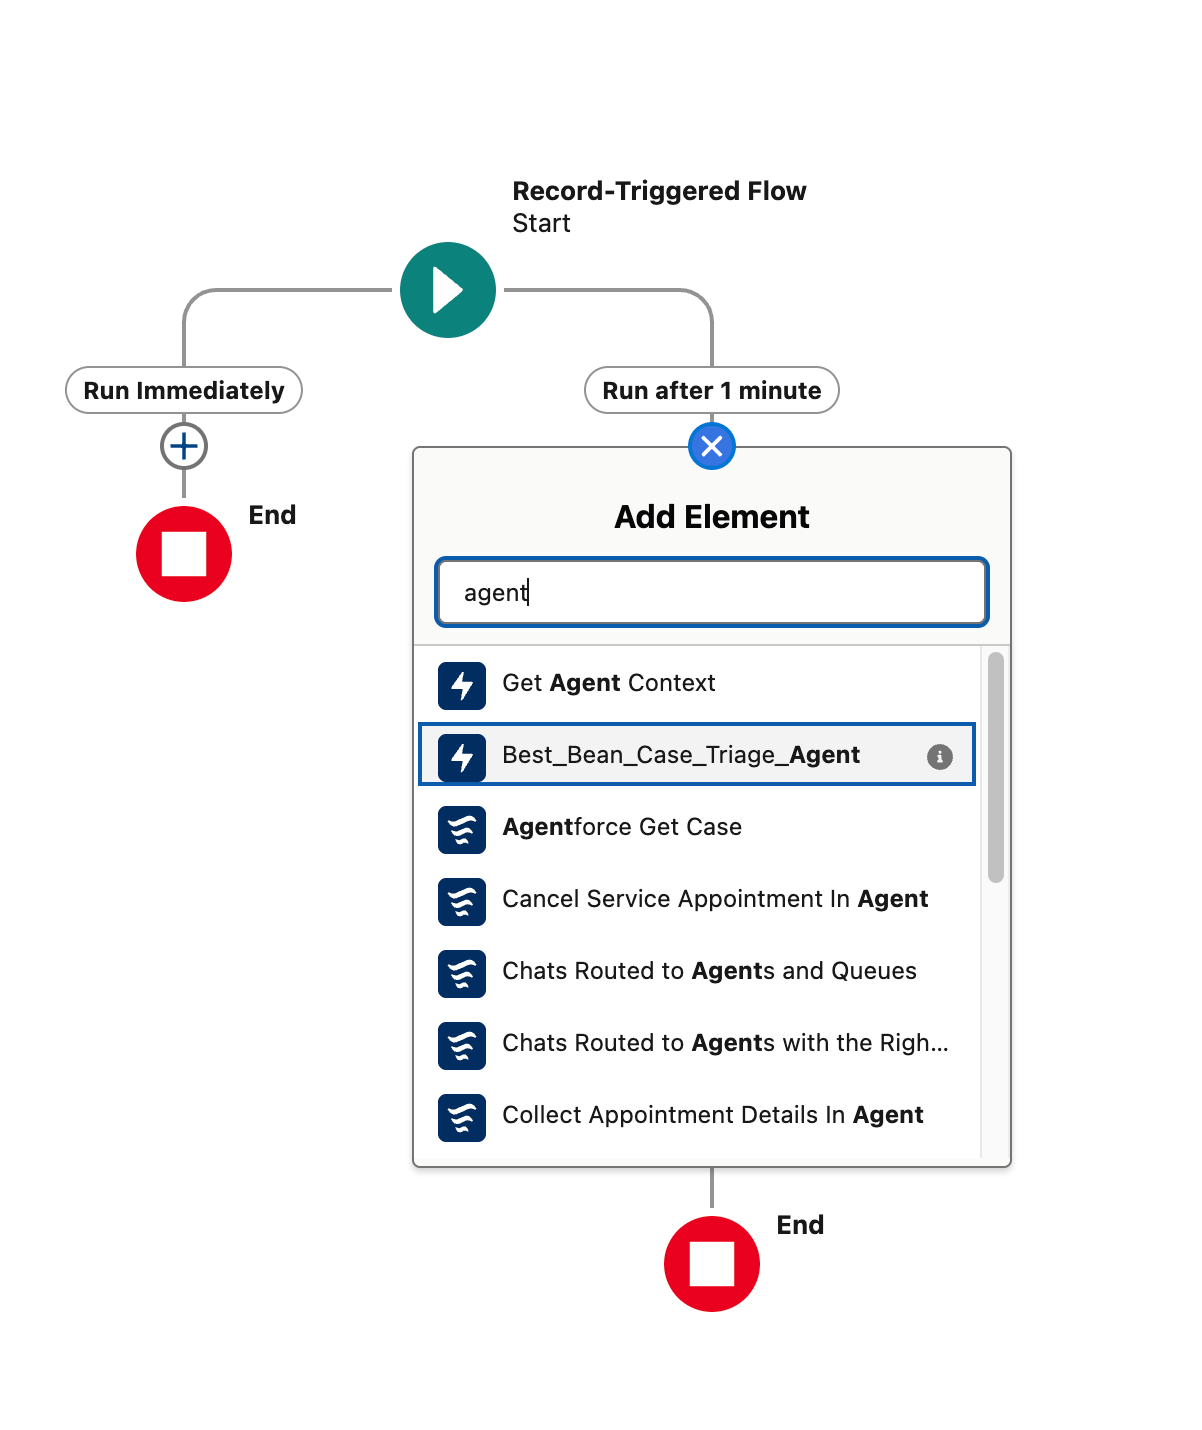
Add a new element in your newly created scheduled path and search for our agent
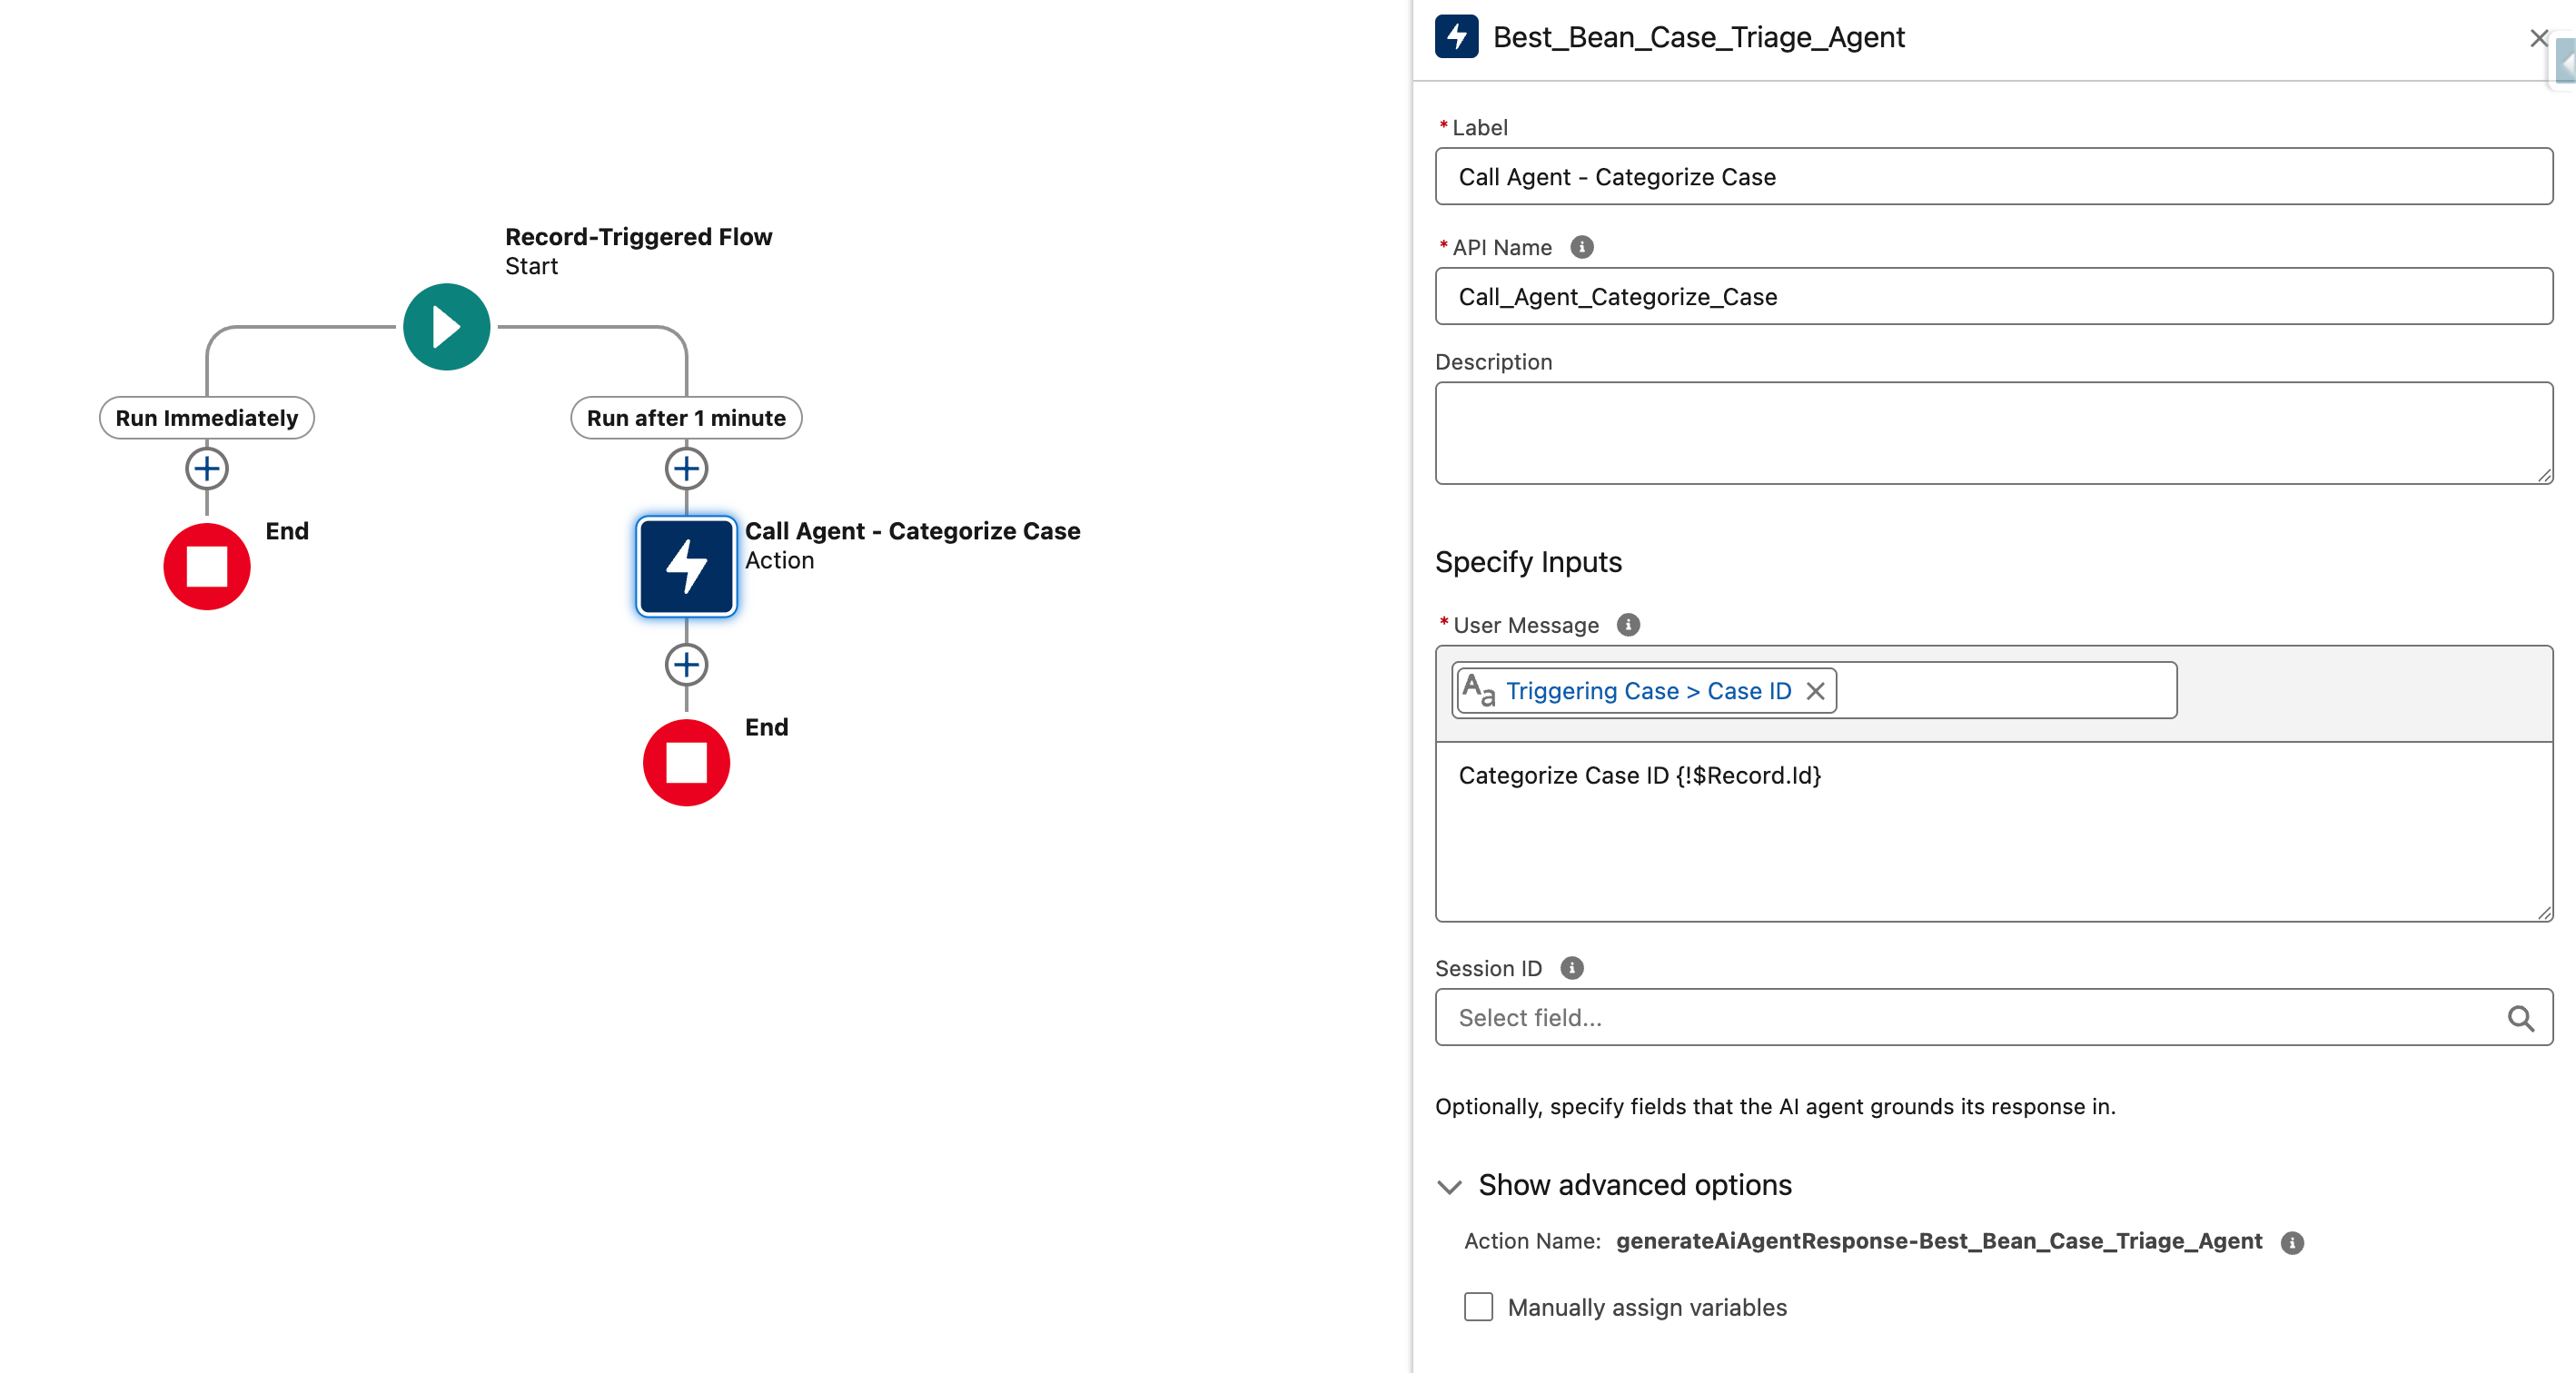
Here we can configure what prompt we want to send to our agent and we can insert record fields into the prompt
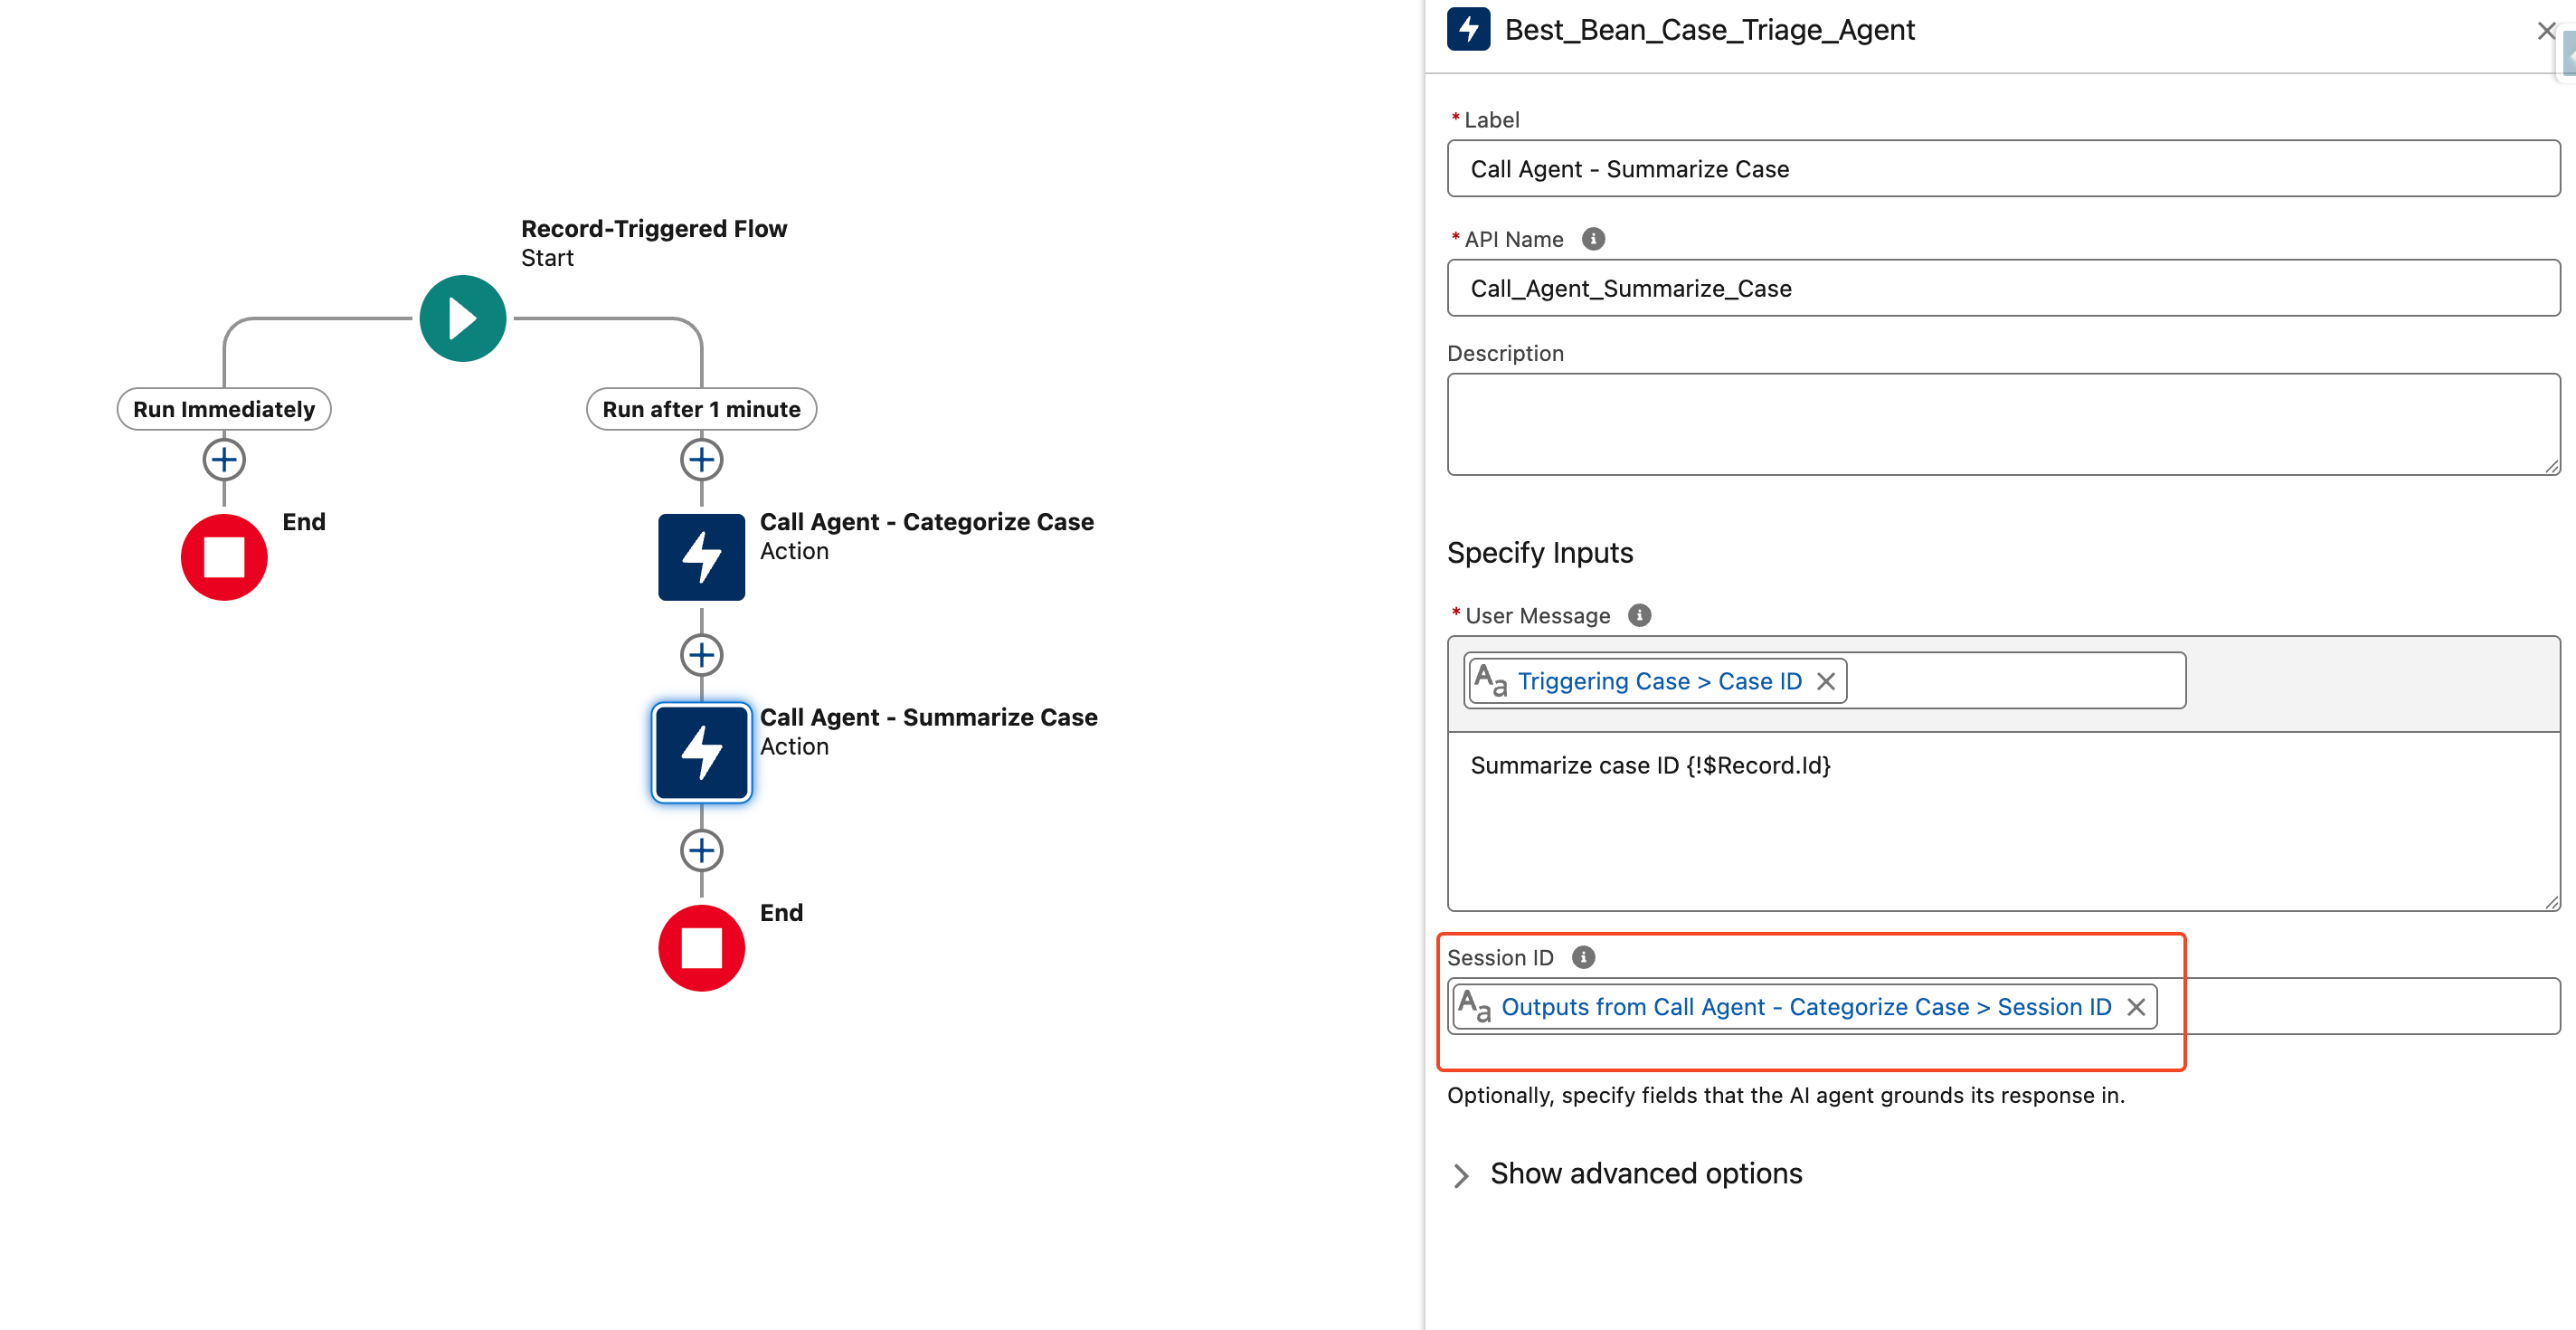
Next, let’s add another call to the agent so that we can get a summary of the case as well as categorizing it. Note that we’re passing the Session ID from our first call to the agent so that the agent knows this is all part of a single conversation
Now let’s save and test our flow. Click Save in the upper right, name the flow Agentforce - Case Triage, and then click Save again
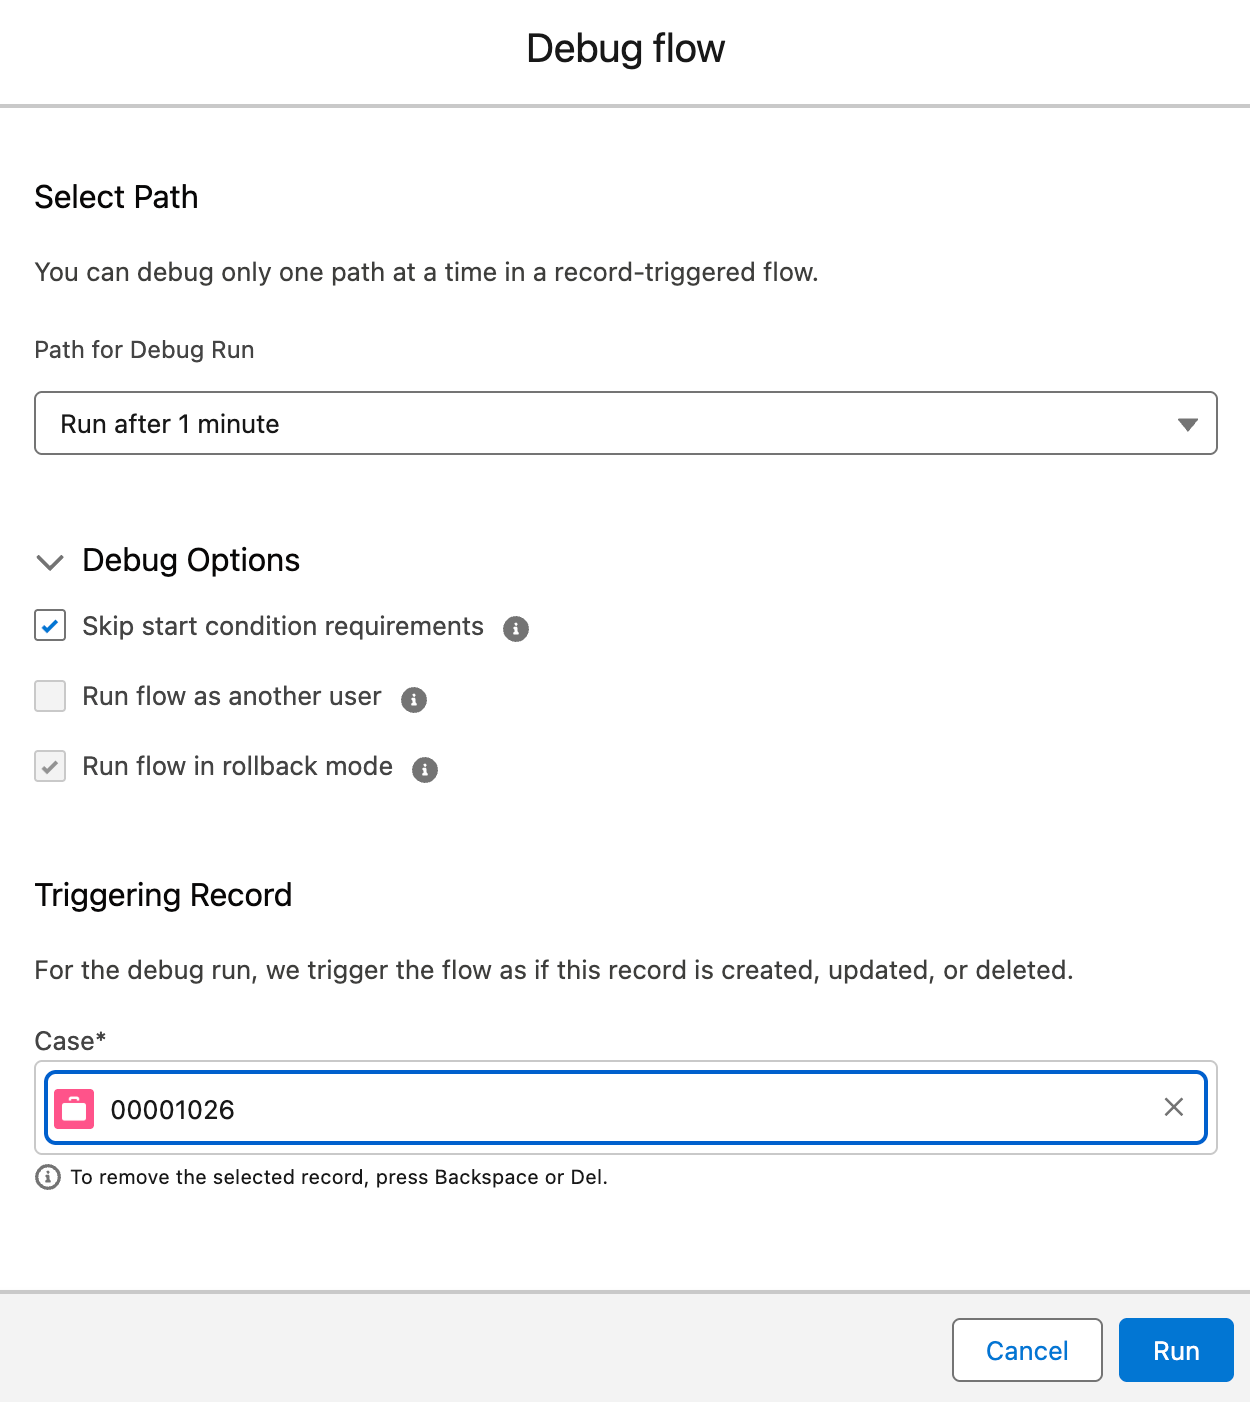
Select Debug in the upper right and then make sure to select your scheduled path, skip start condition requirements, and select your test case. Then click Run
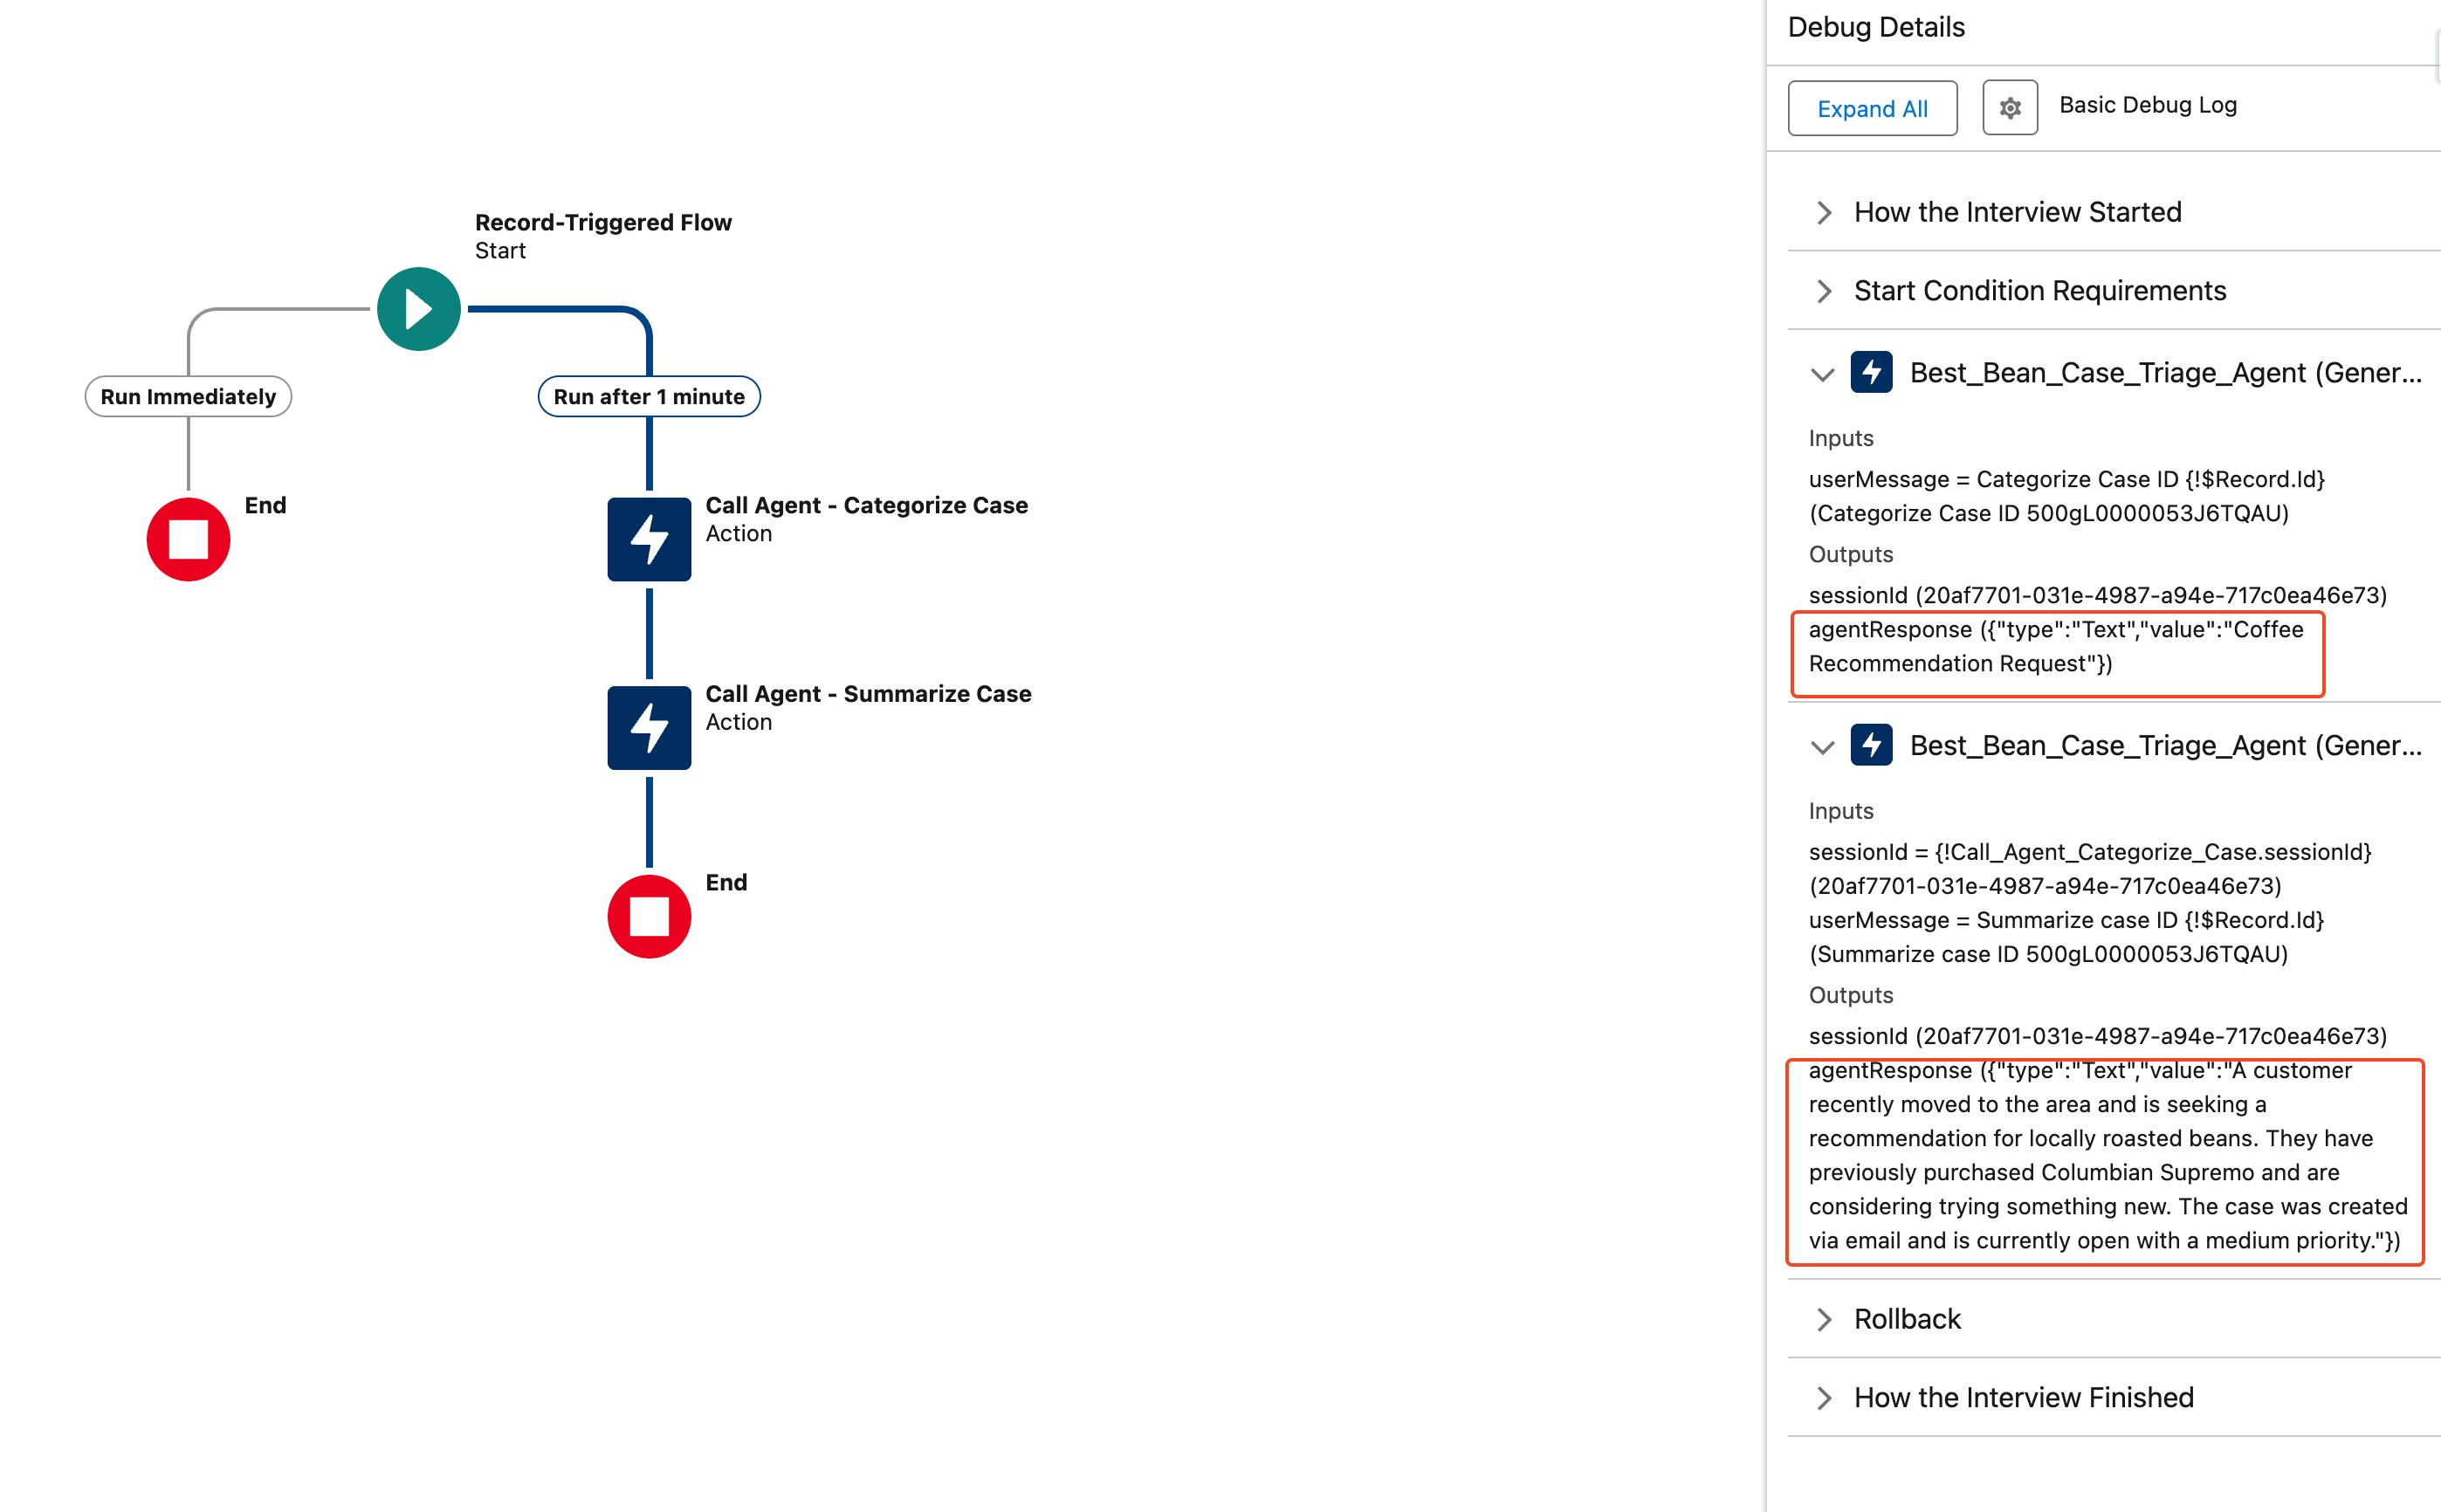
On the right-hand side under Debug Details we can see that our agent is responding the way that we’d expect!
Next Steps
This is a proof of concept, but by this point you can see where we’re going. For organizations that are still using web forms and email-to-case using flows to interact with Agentforce can help triage cases or provide information to internal staff. In a future part two we could update this flow to post the agent summary to Chatter, automatically update a category field on the case, or even send a response email to the customer!
Key Takeaways and Tips
Based on this use case and other Agentforce projects that I’ve been involved in, here are a few takeaways and tips about using Agentforce especially in conjunction with flows.
1. Ensure your instructions and classification description are clear
Agentforce uses the classification description for each topic to determine which topic a prompt is about so it’s important to make sure that these descriptions are clear and don’t overlap between topics or the agent may pick the wrong topic. Similarly, make your instructions as clear as possible to ground the agent and prevent hallucinations. For example, instead of saying “Please don’t include the case ID in your response” say “Never include the case ID in any response”.
2. Make sure you assign permissions to your agents
Updating agent permissions is an easy step to miss and errors caused by missing permissions are sometimes unclear. Service agents start with very limited permissions by default so you’ll need to manually assign appropriate permissions to cases and any other objects that you need your agent to access. It’s good that Salesforce is following the principle of least privilege and you should avoid giving agents any permissions that they don’t need, but this can also be an easy step to miss.
3. Expect validation errors if using change sets and flows
Salesforce flows can only reference an activated agent but when you use change sets the agent will deploy in a deactivated state. Unfortunately this means that if you try to deploy an agent and a flow that references it in the same change set you’ll run into validation errors and be unable to deploy. Additionally, because agents have users associated with them you’ll likely need to create the agent user before you can active your deployed agent. I recommend following this general order if you’re planning to deploy with change sets:
- Create two separate change sets:
- Change Set 1: Your agent and any dependencies like flows, prompts, and actions that the agent uses
- Change Set 2: Any flows or other items that call the agent and need the agent to be activated before they can be deployed
- Turn on generative AI and Agentforce in the environment you’re deploying to
- Validate and deploy Change Set 1
- Create your agent user and assign permission sets
- Activate your agent
- Activate any flows your agent calls
- Validate and deploy Change Set 2
- Activate flows from Change Set 2 and confirm everything is working
4. Make sure you keep track of the agent session ID
If you’re calling an agent from flows make sure that you keep track of the session ID you get from your first call and use it for subsequent calls to the same agent. Not only will this allow the agent to function better because it will retain the context of previous calls from the same flow run, but I suspect it will also reduce the number of conversations you consume and lead to cost savings as well.
5. Don’t rely too heavily on built-in agent actions
For this blog post I created a custom action for our agent to use and there’s a reason for that: I think custom actions are more reliable than the built-in actions. For one thing if you create custom actions you know that they won’t change in a future update and you don’t have that same certainty for the built-in actions, but there’s another issue aside from that. Some of the built-in actions don’t behave the way that you’d expect and require thorough testing before use. For example, there’s a built-in action to get a record, but that action doesn’t return all of the fields on the record. I ran into a situation where I was asking an agent to make a decision based on the details of a record including a specific custom field and it kept making the wrong decision. I found out that the built-in action wasn’t even returning the custom field I needed the agent to look at so I had to build a custom action instead. I think it’s generally safer to use custom actions because then you know exactly what data will be passed to your agent.